
Prologue: From Tribal Circles to Digital Loops
For almost the entirety of human existence, we have organized ourselves in circles. The earliest human tribes sat around fires in circular formations, sharing resources, stories, and tasks. Hunter-gatherers distributed duties based on skills and needs: some hunted, others gathered, some crafted tools, while others cared for children. This circular structure of contribution and distribution helped our species survive for hundreds of thousands of years.
In the past 10,000 years, as complex civilizations emerged, we created hierarchies – pyramids of power that enabled coordination at unprecedented scales. Yet beneath these hierarchies, the essential circle of human cooperation persisted: one group produces what another needs, perpetuating cycles of interdependence that form the foundation of all human societies.
Today, we stand at the threshold of a new evolution in human organization. Digital networks have already transformed how we cooperate and share resources. But most digital platforms remain centralized in structure – controlled by singular entities, much like the kingdoms and empires of old. GRIDNET presents a radical alternative: a return to the circle, but at a planetary scale and with capabilities our ancestors could never have imagined.
Building the Bridge to Decentralization
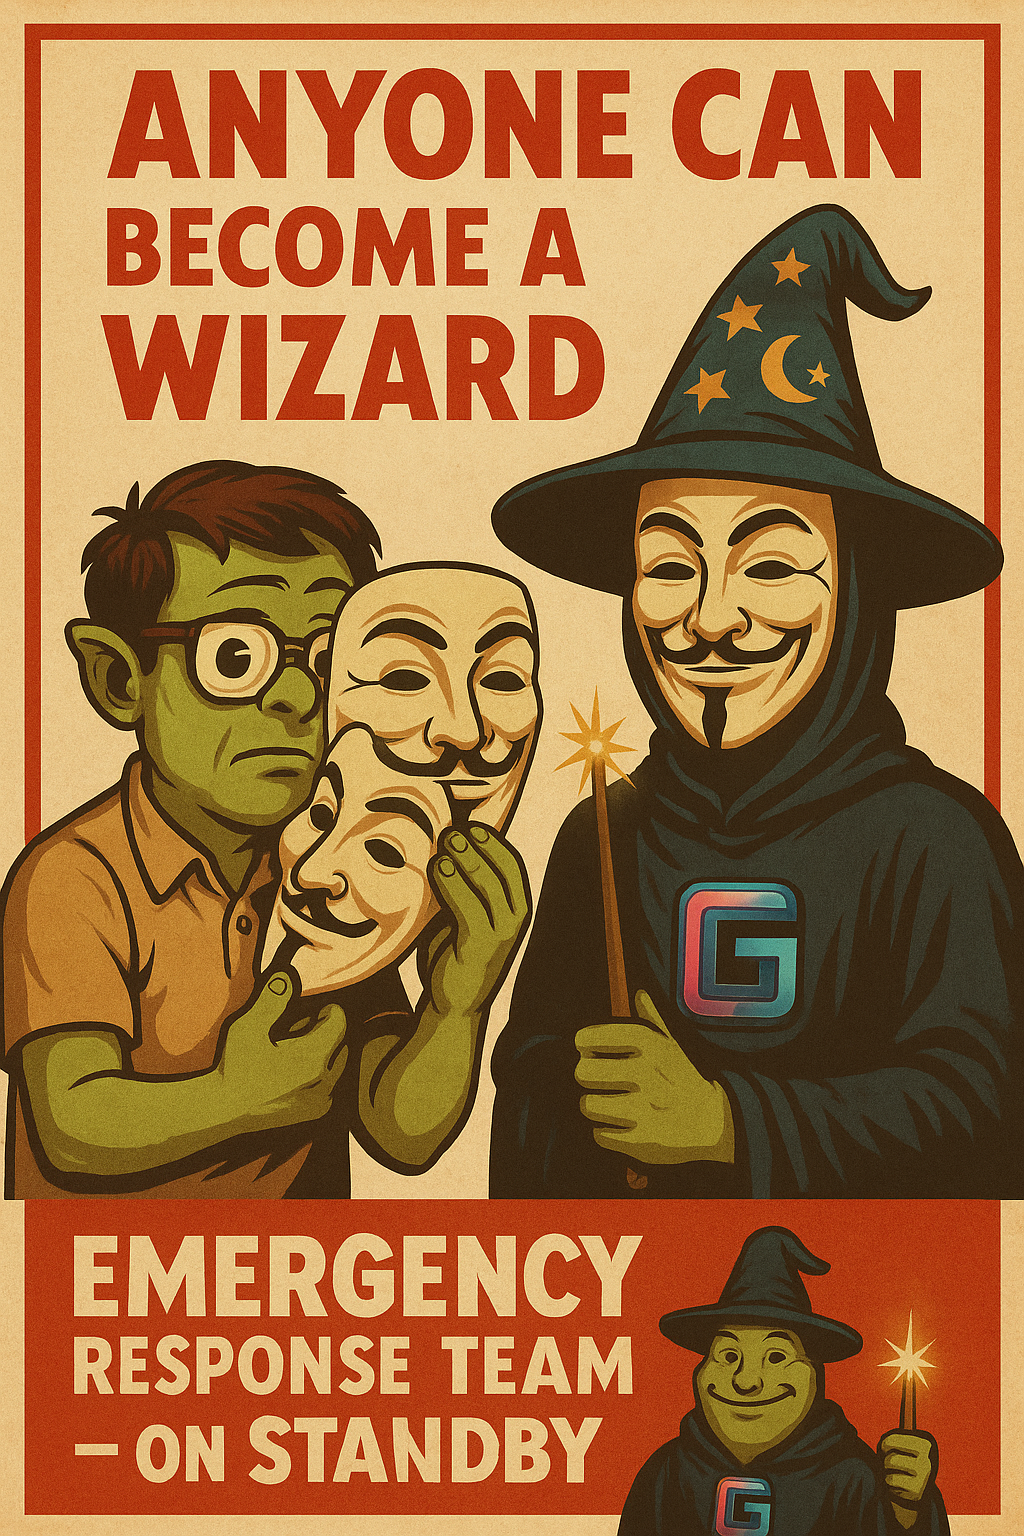
If anything, GRIDNET Basecamp represents an intermediate centralized step enabling our decentralized dreams to become REALITY. A place where we can cast spells—TOGETHER.
We, the Wizards, ensure financing for your projects as long as the Community finds your ideas sound and valid. Decentralized games? Applications? Decentralized social media platforms? As a developer, YOU ARE NO LONGER ALONE.
Gone is the need to file extensive documentation with banks for credit lines, or to negotiate with startup incubators, VCs, angel investors, and private equity firms—only for them to lend you 10K USDT while claiming 80% of your business, treating you like assets to be traded for profit.
Here, the process is beautifully simple:
- File for project incubation
- Wizards evaluate the technical feasibility
- Community validates the concept
- We ensure GRIDNET OS delivers what you need
Take your ideas and your business wherever you want. We want you to grow. We want the world to be decentralized. Carry your freedom with you, and let your ideas benefit our entire Community. Grow together with us.
What we care about most are innovative projects, expanded possibilities, and enhanced functionality sets. If you’re an open-minded person willing to make a difference—even by creating an extraordinarily cool decentralized game—you will feel at home here.
Our Community will ensure you have the resources to make a living while building the decentralized future we all envision.
Key Points
- Wizards are not be be seen as ultimate decision makers. All decisions are taken by Community with Wizards acting as moderators. We transition towards full DAO based governance, with semi-automated on-chain decision making etc. Yet still no decentralised project on our planet exists as of now which would allow for the amount of data and agility required for versioning, online project editing, collaboration, tracking of financing etc. We ARE certainly getting there with GRIDNET OS (see the Whiteboard UI dApp, see the eMeeting UI dApp with state of the art group end-to-end encrypted audio/video calls – BUT – we are not there yet for full fledged decentralised project management). The NextCloud-based GRIDNET Basecamp is to be though of as a space shuttle bringing further building blocks to the decentralized orbit of GRIDNET OS.
- Access: GRIDNET Basecamp is now available at https://team.gridnet.org
- Account Security:
- No email required for registration
- If using email, create a dedicated account (e.g., Gmail sub-account)
- Important: Email addresses are NOT considered private on this platform
- Single Sign-On via Gmail is supported
- Purpose & Function:
- Serves as a bridge between centralized workflows and the decentralized GRIDNET OS
- Facilitates collaboration between core team, third-party developers, and content creators
- Enables structured project tracking, resource allocation, and community governance
- Provides transparent accountability for GNC distribution and project financing
- Platform Capabilities:
- Real-time collaboration on documents, including Microsoft Office formats (browser-based)
- Integrated whiteboard functionality for visual collaboration
- Group chats and video/audio conferencing
- Team management tools for organizing developers and contributors
- Centralized repository for marketing assets accessible to influencers
- Opportunities:
- Third parties can apply for financing of GRIDNET OS UI dApp development
- Teams can establish their own managed workspaces within the platform
- Content creators can participate in the Assets Request Board system
- Future Direction:
- While built on battle-tested centralized technology (NextCloud), GRIDNET Basecamp is transitioning toward fully decentralized operation
- The roadmap includes DAO-driven governance, decentralized voting, and automated GNC provisioning
- Serves as a “space shuttle” delivering new functionalities to the decentralized GRIDNET OS ecosystem
The Circular Community: Creators and Requesters
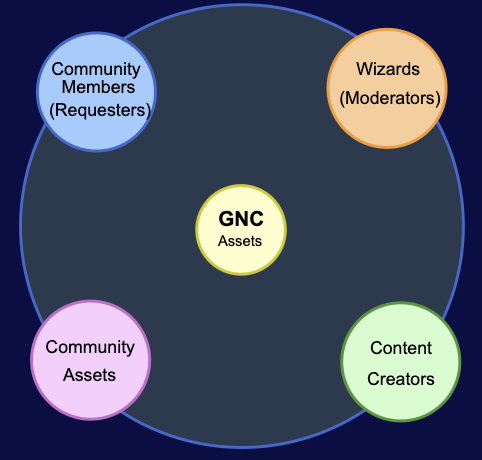
At the heart of GRIDNET lies a simple yet powerful principle: a circular relationship between community members. In any functioning ecosystem, different organisms fill different niches, creating a self-sustaining web of interactions. The GRIDNET community operates on a similar principle.
Some members identify needs – educational content, explanatory graphics, technical tutorials – that would benefit the wider community. Others possess the skills to fulfill these needs. Rather than relying on central authorities to identify and commission necessary resources, GRIDNET enables direct cooperation through its Assets Request Board.
This circular flow works as follows:
- Community members and influencers identify needs and request specific content assets
- Wizards (system developers and moderators) approve worthwhile requests and assign GNC value
- Content Creators choose tasks that match their skills and passion
- Completed assets return to the community, enhancing collective knowledge
- GNC rewards flow to contributors, incentivizing future participation
Unlike traditional hierarchical organizations where value flows primarily upward, GRIDNET’s circular structure ensures that value continuously circulates throughout the community. This mimics natural ecosystems more than it does conventional human institutions – and perhaps this is why it feels simultaneously revolutionary and deeply familiar to us.
GRIDNET OS: The First Truly Decentralized Operating System
Throughout computing history, operating systems have followed the same pattern as political systems: centrally designed, centrally controlled, hierarchical in structure. From MS-DOS to Windows, from MacOS to Linux distributions, all operating systems – even open-source ones – ultimately require some form of central governance.
GRIDNET OS represents the first genuine break from this pattern – the first truly decentralized operating system in human history. This is not merely a technical achievement but a conceptual leap comparable to the transition from monarchy to democracy, or from planned economies to market systems.
What makes this possible now, when it wasn’t before? Just as writing enabled laws to exist independent of kings, and printing presses allowed knowledge to exist independent of churches, blockchain technology enables consensus to exist independent of central authorities. GRIDNET OS leverages this capability to create an operating environment where no single entity controls the system, yet order and functionality persist.
The implications are profound. In the same way that democratic governance fundamentally transformed human political organization in the 18th-20th centuries, truly decentralized computing may reshape our digital existence in the 21st century and beyond.
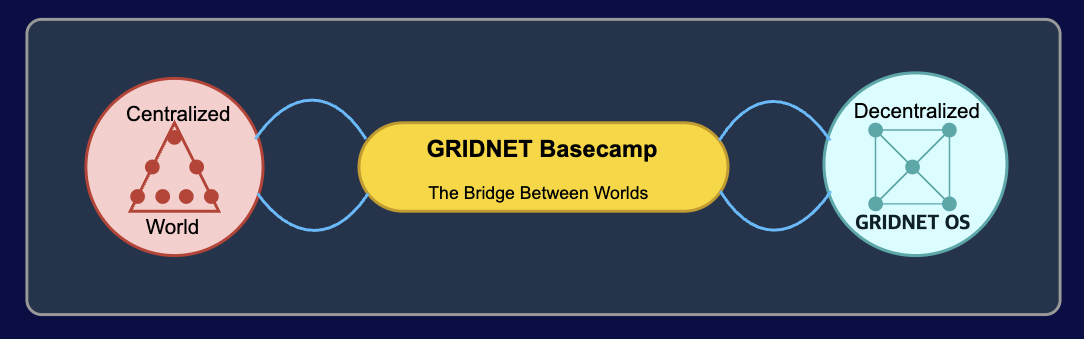
Basecamp: The Bridge Between Two Worlds
Throughout history, revolutions rarely happen in a single, clean break with the past. The transition from one paradigm to another typically involves hybrid forms – bridges between what was and what will be. The American Revolution still incorporated English common law. Early democracies retained many aristocratic privileges. The first automobiles were called “horseless carriages” and designed to look like the vehicles they replaced.
GRIDNET Basecamp functions as precisely this kind of evolutionary bridge. While GRIDNET OS itself embodies full decentralization, Basecamp is an intermediate bridge between the two realms. It is a space shuttle launching new building blocks into the decentralized orbit of GRIDNET OS.
This hybrid approach serves several crucial functions:
- It enables teams to collaborate using familiar paradigms while building unfamiliar ones
- It provides a structured environment for tracking projects and coordinating efforts
- It facilitates real-time communication between team members
- It creates a centralized interface for external teams and projects to apply for funding
- It offers a controlled environment to develop and test functionality before decentralization
Basecamp should not be seen as a contradiction of GRIDNET’s decentralized vision, but rather as a necessary evolutionary step toward it. Just as mammals once needed reptilian traits to evolve beyond them, new paradigms often require elements of the old to fully emerge.
The Wisdom of Wizards and Crowds: Collaborative Governance
Human governance has oscillated between two flawed extremes: rule by the few and rule by the many. Aristocracies and dictatorships concentrate wisdom but also concentrate corruption and self-interest. Pure democracies distribute power but can succumb to the tyranny of uninformed majorities.
The most successful governance systems in history have found ways to balance these extremes – creating checks and balances that harness both the wisdom of experts and the collective judgment of communities.
GRIDNET’s governance model embodies this balanced approach. The Wizards – developers and system architects with deep technical knowledge – work in partnership with the broader community. Neither group rules absolutely. Instead, they form a decision-making circle where specialized knowledge meets collective intelligence.
On the Assets Request Board, this plays out in practical terms:
- Community members identify needs (harnessing distributed knowledge)
- Wizards evaluate, prioritize, and assign resources (applying specialized expertise)
- Content Creators contribute based on skills and interests (distributed execution)
- The community benefits from and evaluates the results (collective feedback)
This approach recognizes that neither central planning nor pure crowd-sourcing alone can optimize complex systems. The future likely belongs not to fully decentralized or fully centralized models, but to thoughtfully designed hybrid systems that leverage the strengths of both approaches.
GNC: The Currency of Contribution
Money is perhaps humanity’s most successful fiction. For thousands of years, we have assigned value to objects with no intrinsic utility – shells, beads, metal discs, paper notes, and now, digital tokens. These tokens work because of shared belief in their value, enabling cooperation among strangers at unprecedented scales.
Traditional currencies, however, remain tethered to nation-states and central banks – hierarchical entities that control money supply and policy. Cryptocurrencies introduced the possibility of currencies independent of central authority, but many simply replicated speculative market dynamics rather than serving specific community purposes.
GNC assets represent something different – a currency intrinsic to a functional system, with value derived from actual contribution rather than speculation. Within GRIDNET, GNC serves as the lifeblood of the circular community relationship:
- GNC originates from the ICOFund domain/account, managed by Wizards
- It flows to Content Creators who contribute valuable resources to the community
- These contributions enhance the GRIDNET ecosystem, increasing utility and adoption
- This increased utility strengthens the value proposition of the entire system
- The cycle continues as more value flows through the ecosystem
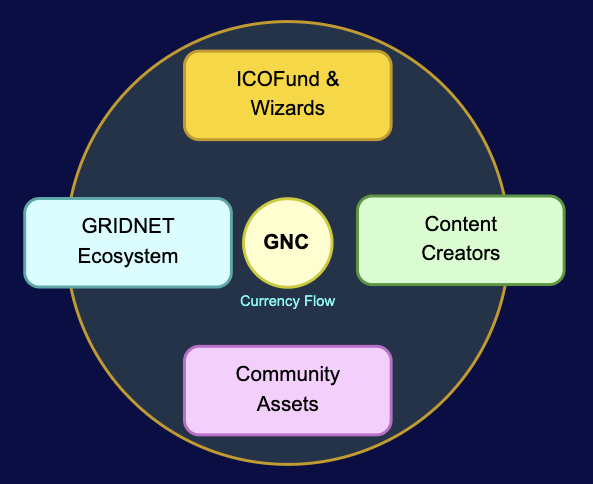
Unlike many cryptocurrencies that seek value primarily through scarcity and speculation, GNC derives value from its role in facilitating productive contribution. It is a currency backed not by gold or government decree, but by the tangible output of community members.
Join the Evolution: An Invitation
Throughout history, the most significant social and technological revolutions have begun with small groups of pioneers working at the margins before their innovations became mainstream. Democracy was once a radical experiment limited to ancient Athens. The internet began as a specialized academic network before transforming global communication.
GRIDNET represents a similar pioneering effort – a community and technology at the forefront of what may become a fundamental shift in how humans organize digitally. By joining now, you become part of this evolutionary journey.
The GRIDNET Basecamp platform is now available at https://team.gridnet.org. Here you can:
- Explore the Assets Request Board and see the circular community in action
- Apply to become a Content Creator and earn GNC rewards for your contributions
- Submit requests for content and resources that would benefit the community
- Connect with Wizards and other community members to collaborate on projects
- Help shape the transition toward fully decentralized applications on GRIDNET OS
Whether you’re a developer, creator, visionary, or simply curious about decentralized futures, GRIDNET Basecamp offers an entry point into this emerging paradigm.
The Circle Completes
For 300,000 years, Homo sapiens organized in circles around fires, sharing tasks and resources within small, trusted groups. For 10,000 years, we built hierarchies that enabled coordination among strangers but concentrated power in the hands of the few. For 300 years, we’ve experimented with distributing power more broadly through democratic systems and markets.
Now, digital technology enables us to combine the intimacy and trust of tribal circles with the scale and efficiency of modern systems. GRIDNET represents one of the boldest experiments in this new synthesis – a return to circular organization, but at unprecedented scale and with remarkable new capabilities.
By joining this community, you’re not just adopting a new technology. You’re participating in the ongoing evolution of how humans cooperate and organize. The circle is completing – not by returning to the past, but by spiraling forward into new possibilities that our ancestors could scarcely have imagined.
Assets Request Board for GRIDNET Basecamp
The Assets Request Board is a public Kanban-style board in GRIDNET’s Basecamp (Deck app) where community members and influencers can request new explanatory content assets (graphics, videos, tutorials, etc.). Approved Content Creators can then be assigned to produce these assets. Wizards (community moderators) oversee this board – they approve requests, assign tasks to creators, and ensure each request moves through stages from initial idea to final delivery and GNC reward payment. This unified board simplifies the content creation process, providing transparency and a clear structure for everyone involved.
Board Columns and Asset Lifecycle
The board is organized into several columns (lists), each representing a stage in the lifecycle of an asset request. Only Wizards can move cards between columns, ensuring that each stage is properly managed. The columns on the Assets Request Board are:
- New Request (Submitted) – Newly submitted asset requests from community members or influencers appear here. Each card in this column represents a content idea awaiting review. The card includes details of what content is needed (using the template provided). Wizards monitor this list and review each request in turn.
- Approved (Open for Assignment) – Once our team reviews a request and deems it appropriate (feasible, non-duplicate, aligned with community goals), the card is moved to Approved. In this column, the request is officially accepted. Wizards will typically update the card with a confirmed reward amount (in GNC) and any additional notes or requirements. The task is now open to be assigned to an approved Content Creator. (At this stage, Wizards may either wait for a Content Creator to volunteer via comments or proactively assign one.)
- Assigned & In Progress – When our team assigns an approved request to a specific Content Creator, the card moves into Assigned & In Progress. The Content Creator’s name is noted on the card, along with a due date if applicable. In this column, the asset is actively being created. The Content Creator works on the graphic/video/tutorial and posts updates or questions in the card’s comments. The requester and Wizards can also chime in to clarify details as needed. This stage is all about execution and iteration.
- Ready for Review (Content Delivered) – Once the Content Creator finishes the asset, they attach the content or provide a link in the card and notify the Wizards (via a comment) that it’s ready. The card then moves to Ready for Review. Wizards (and possibly the original requester, if needed) will review the delivered content here. They check that it meets the requirements, is accurate, and follows any style guidelines. If changes are required, the card remains in this column while the Content Creator makes revisions (with the status updated in the card/comments).
- Completed (Delivered & Paid) – After the content passes review and is approved by a Wizard, the task is marked completed and the card moves to Completed. At this final stage, Wizards arrange for the reward payment in GNC to the Content Creator as promised. The card’s description or comments should be updated with a final note (e.g., confirmation of delivery and payment). Completed tasks remain visible here as a record of fulfilled requests and as a reference library of created assets.
(Optional: There can be an additional Closed/Rejected column for requests that do not get approved. For example, if a request is a duplicate, inappropriate, or not feasible, Wizards can move the card to “Closed” with an explanation in the comments. This keeps the “New Request” column clean while providing transparency about why certain requests did not proceed.)
Each column is publicly viewable so community members can track the progress of their requests in real time. Because only Wizards have permission to move cards, the workflow remains orderly – community requesters submit ideas, Content Creators focus on execution, and Wizards handle the stage transitions.
Card Templates for Each Stage
To ensure consistency, each card on the Assets Request Board should follow a template that is updated as it progresses through the stages. Below are recommended card content templates for each stage of the process. When creating or updating a card, copy the relevant template sections into the card’s description and fill in the details.
- New Request (Submission Stage) – Card Template:When a community member or influencer creates a new request, they should format the card as follows:
Asset Title: [A short, descriptive title for the requested asset]

Description/Purpose: [A detailed description of what the asset should cover or achieve. Include the topic, key points to explain, and why this content is needed.]

Asset Type: [Graphic / Video / Article / Tutorial / Other – specify the format of content being requested]

Target Audience: [e.g., Beginner, Advanced, General Audience – who is this content aimed at?]

Language: [Preferred language for the content, e.g., English, Polish, Spanish]

Additional Requirements: [Any specific requirements or preferences – e.g., length/duration, image dimensions, style or branding guidelines, platform where it will be used]

Requester: [Your name or handle, if not automatically noted on the card]

References/Links: [Optional – links to relevant materials or examples for inspiration]
The requester should fill in all applicable fields. The card’s title should be concise (e.g., “Tutorial: Setting Up a Node on GRIDNET”) and the description should clearly outline expectations. Providing thorough info at this stage helps Wizards and Content Creators understand the request.
- Approved (Post-Review Stage) – Card Template Update:Once a Wizard moves the card to “Approved,” they will augment the card with additional fields for assignment and reward:
Status: ✅ Approved by on [Date]. (Ready for assignment to a Content Creator)

Reward: [X] GNC (to be paid upon completion)

Priority: [High / Medium / Low] (optional, if applicable based on urgency or importance)

Assigned Content Creator: [To be determined or @Name once assigned]
In this stage, the Wizards make it clear that the task is approved and what the incentives are. The “Assigned Content Creator” can remain “To be determined” at first. Wizards may add a comment calling for volunteers or indicating that they are seeking an assignee.
- Assigned & In Progress – Card Template Update:When a task is assigned, Wizards (or the Content Creator) should update the card description to reflect the current status:
Status: 🚧 In Progress – Assigned to [Content Creator Name] on [Date].

Assigned Content Creator: [Name (@username)]

Deadline: [Date or timeframe for completion, if set]

Current Progress: [Optional – brief notes on progress, e.g., "Outline drafted", "50% complete", "Awaiting feedback on script"]
The Content Creator can also add a checklist or sub-tasks in the card (e.g., “Storyboard”, “Draft version”, “Review edits”, “Final production”) to track work internally. Throughout this stage, the card’s comments serve as the primary communication channel for updates, questions, and clarifications.
- Ready for Review – Card Template Update:When the content is finished and uploaded, update the card as follows:
Status: 📋 Ready for Review – Content submitted on [Date].

Deliverables: [Link or attachment to the completed asset. For example: "See attached video file", "Image uploaded above", or "Draft article: link to Google Doc"]

Notes for Review: [Any notes from the creator about the submission, e.g., "Please check audio at 2:00 for volume", "Colors can be adjusted if needed", or "Alternate version in second attachment".]
The Wizard(s) reviewing will use the comments to give feedback or approval. If revisions are needed, the card stays in this column; the Content Creator should address the feedback and update the deliverables, then comment again to notify Wizards for another review round.
- Completed – Card Template Update:After final approval, the card should be updated to record completion:
Status: 🎉 Completed – Approved  on [Date].

Outcome: [Summary of the final outcome, e.g., "Infographic published on Twitter and community wiki", or "Video uploaded to official YouTube channel".]

Reward Payment: [X] GNC transferred to [Content Creator Name] on [Date]. (Transaction reference: [Optional TX ID or confirmation if applicable])

Acknowledgements: [Optional – e.g., "Thanks to [Content Creator] for the great work on this asset!" and/or "Requested by [Requester Name]".]
Wizards should ensure the reward payment details are recorded for transparency. After this, the task is considered closed. The card remains in the Completed column as a public record and for future reference (others can see the asset or find it via tags).
Using these templates at each stage ensures anyone viewing the card can quickly understand its history and current status. The structured format helps Wizards, Requesters, and Content Creators stay aligned and not miss important information.
Guidelines for Requesters (Community Members & Influencers)
Community members and influencers who want to request content should follow these guidelines to make the process smooth and successful:
- Search Before Requesting: Before creating a new request, check the board (especially the Completed column or any existing asset library) to see if a similar asset already exists or is in progress. This avoids duplicate requests and shows you what’s already available.
- Use the Template: When submitting a request, use the New Request card template provided above. Provide a clear title and a thorough description. The more details you give, the easier it is for Content Creators to deliver exactly what you need. Incomplete requests might be delayed while Wizards seek clarification.
- Specify Audience and Purpose: Clearly state who the content is for and what you want to achieve. For example, “This video is for beginner users who need help setting up a wallet” or “This graphic will be used in social media to explain our project.” This context helps creators tailor the content appropriately in tone and depth.
- Provide a clear title and a thorough description. The more details you give, the easier it is for Content Creators to deliver exactly what you need. Incomplete requests might be delayed while Wizards seek clarification.
- Specify Audience and Purpose: Clearly state who the content is for and what you want to achieve. For example, “This video is for beginner users who need help setting up a wallet” or “This graphic will be used in social media to explain our project.” This context helps creators tailor the content appropriately in tone and depth.
- Tag Your Request: Apply relevant tags/labels to your card if possible. For example, tag the asset type (Graphic, Video, Tutorial), the difficulty level (Beginner or Advanced), and the language. Proper tagging ensures your request is categorized correctly and can be filtered easily by others. If you’re not sure about tags, Wizards will adjust them, but it’s helpful if you add what you can.
- Be Responsive to Questions: After submitting, keep an eye on your request card. Wizards might ask clarifying questions in the comments or suggest changes to your description. Respond promptly to keep the process moving.
- Be Responsive to Questions: After submitting, keep an eye on your request card. Wizards might ask clarifying questions in the comments or suggest changes to your description. Respond promptly to any questions or requests for info – this helps move your request to the Approved stage faster. If you disappear, your request might stagnate or be closed due to lack of info.
- Stay Informed (but Patient): Once your request is approved, understand that it may take some time to be assigned and completed. You can watch as it moves through the columns. It’s okay to ask for status updates politely (for instance, if it’s been quiet for much longer than usual), but keep in mind Content Creators may be balancing tasks. Wizards will ensure nothing is forgotten.
- Engage During Review: If you’re the requester, you might be tagged when the content is ready for review, especially if your input is needed to verify that it meets your needs. Provide feedback if you have any (e.g., “This covers everything I wanted, thanks!” or “It’s great, but can we also mention X?”). Your perspective is valuable, but also trust the Content Creator and Wizards’ expertise on quality and style.
- Express Gratitude and Feedback: After completion, if you found the asset useful, do thank the Content Creator and Wizards in the card comments. If you have suggestions for improvement, you can mention them as well (constructively). Positive feedback motivates creators, and constructive feedback can help in future tasks.
By following these guidelines, requesters help ensure their ideas are understood and acted on efficiently. A well-prepared request with active requester participation is more likely to result in a high-quality asset that meets the need.
Guidelines for Content Creators
Approved Content Creators are community members who have applied and been authorized to create official content assets. If you are a Content Creator working on this board, please keep the following guidelines in mind to collaborate effectively:
- Review Available Tasks: Regularly check the Approved (Open for Assignment) column for new requests that match your skill set (e.g., graphic design, video editing, technical writing). If you see a request you’d like to work on, leave a comment on that card expressing interest. For example: “I can take this on, I have experience with infographic design. @WizardName”. This lets Wizards know you’re available. (If multiple creators volunteer, a we will decide who to assign, so don’t be discouraged if not every volunteer opportunity is assigned to you.)
- Wait for Official Assignment: Only start working on a task after we assign it to you and moves the card to In Progress with your name. This prevents confusion or duplicate work. Wizards may confirm assignment by tagging you in a comment like “Assigned to @YourName” and updating the card. If you commented to volunteer and haven’t heard back yet, you can follow up after some time or look for another task in the meantime.
- Clarify Requirements Up Front: As soon as you’re assigned, review the entire card (description and prior comments) carefully. If anything is unclear or if you need additional resources (logos, data, access, etc.), ask in the card comments. It’s better to gather clarity at the start than to redo work later. Tag the requester or Wizards as needed for specific questions.
- Use the Card to Track Work: Follow the In Progress template by updating the card description with your name and the start date, and note any deadline. Feel free to add a checklist of sub-tasks on the card (Deck allows adding checklist items). Checking off items (like “script written”, “voiceover recorded”, “first draft complete”) not only helps you stay on track but also lets Wizards and the requester see progress at a glance. You can also post periodic short updates in comments, especially for longer tasks (e.g., “Drafting completed, moving on to recording audio”).
- Maintain Quality and Branding: Ensure the content you produce meets the community’s quality standards and branding. Follow any style guides provided. For example, use official logos and correct color schemes for graphics, maintain accuracy and clarity in tutorials, and ensure good production values in videos (clear audio, proper resolution). If no formal guide exists, look at similar past assets in the Completed column as a reference for the expected tone and quality.
- Time Management: Honor the deadlines given. If a card has a due date or is tagged
Urgent, prioritize accordingly. If no deadline is explicit, use reasonable judgment (Wizards might give guidance like “hope to have this in about 2 weeks”). If you encounter delays (personal issues, unexpected complexity, etc.), inform us before the deadline passes. They can possibly extend the deadline or find additional help. Communication is key – it’s understood that delays can happen, but keeping silent is not okay. - Submit Work for Review: When you finish the asset, attach the file(s) to the card or provide a stable link. For large files, you might use a cloud storage link or a specialized platform (e.g., upload a video to an unlisted YouTube link for preview). Ensure the Deliverables section in the card description is filled out with where to find the content. Then add a comment tagging the relevant Wizard(s) and requester: e.g., “@WizardName @RequesterName The video is ready for review, please check the link above.” After this, move on to other work while waiting – do not mark the card complete yourself.
- Handle Feedback Gracefully: It’s common to receive some feedback or requests for edits. Check the card comments after submission. If Wizards/requester suggest changes, acknowledge the feedback and make the revisions as needed. Use the Notes for Review field or follow-up comments to describe what you changed or address any concerns. For example, “I’ve increased the font size on the infographic for readability, and corrected the stats in section 2.” Re-submit the updated content promptly. Remember, feedback isn’t personal criticism – it’s to ensure the final asset is the best it can be.
- Completion and Reward: Once we approve the content and moves the card to Completed, your job on that card is done! We will handle the GNC reward payment. Make sure you have provided your wallet/address to them beforehand (probably during your application or via a profile). The card will note that you were paid. If there’s any discrepancy (e.g., you haven’t received payment after a reasonable time), reach out to us directly (you can use Talk for a private message if needed and contact Wizards account). Typically, though, this process is smooth: you create great content, the community benefits, and you earn your reward.
- Continuous Improvement: As an approved Content Creator, you are a part of the GRIDNET content team. Feel free to share tips with fellow creators, ask for help if stuck, or suggest improvements to these processes. You might use a separate forum or group chat for creators to discuss things outside specific request cards. Wizards will appreciate suggestions that can streamline the workflow or address common issues. Also, maintain a good record – reliable and high-quality work might lead to more frequent assignments or even higher rewards over time.
By following these guidelines, Content Creators can effectively contribute to the community, build a portfolio of work, and earn GNC rewards. The key is communication, quality, and collaboration at each step of the process.
Process for Applying to Be a Content Creator
Community members who want to become approved Content Creators (so they can be assigned tasks on this board) need to go through an application process. This ensures that creators have the necessary skills and understand GRIDNET’s content standards. Here’s how to apply:
- Visit the Content Creator Application Board: GRIDNET Basecamp provides a separate Deck board for creator applications. (This could be linked from the Assets Request Board or mentioned in community docs – e.g., an “Apply to be a Content Creator” link.) On that Application Board, you’ll find instructions and an application card template.
- Submit Your Application Card: Create a new card in the Application board, filling out the required details. Typically, include:
- Name and Contact: Who you are and how to reach you (your Basecamp username, email, or other contact info).
- Skills and Content Areas: Describe what kind of content you can create. Mention your specialties (e.g., “infographic design”, “animated videos”, “technical writing”) and any specific domain knowledge (e.g., “familiar with blockchain and DeFi concepts”).
- Experience and Portfolio: List any relevant experience or qualifications. Provide links to examples of your work if available (e.g., a portfolio, previous graphics or videos, blog posts/tutorials you’ve written, etc.). If you have contributed to other community projects or open-source efforts, mention those too.
- Availability: Note how much time you expect to dedicate (for instance, “5-10 hours per week” or “mostly weekends”) and any schedule constraints. This helps Wizards know what scope of tasks to assign.
- Motivation: A brief statement on why you want to be a content creator for GRIDNET. Enthusiasm and alignment with the community’s mission can help your application.
- GNC Wallet Address: (If applicable at this stage) Provide the address where you would like to receive rewards. If security is a concern, you could optionally provide this after acceptance via a secure channel instead of on the public card.
- Wizards’ Review of Application: Wizards will monitor the Application Board and review new submissions. They may leave comments on your application card with questions or requests for clarification. For example, they might ask to see a specific type of work sample or inquire about your knowledge of a topic. Engage with these questions promptly and thoroughly.
- Approval & Onboarding: If your application is approved, Wizards will move your card to an “Approved” or similar column on the Application Board (or otherwise indicate acceptance). We will likely reach out with a welcome message. You will be granted the “Content Creator” role or added to the list of approved creators. This may include giving you certain permissions on the Basecamp (Deck) boards (like the ability to comment on the Assets Request Board cards and access any private creator resources). They might also invite you to a communication channel for Content Creators (for example, a Talk chat room or a forum thread for creators).
- Orientation: Upon approval, you might receive onboarding materials. This could be a guide with best practices, branding assets (logos, design templates), and references to past exemplary content. You might even be asked to start with a small test task or contribute to a simple request to get familiar with the process. Take time to review any guidelines provided – this sets you up for success in handling real requests.
- Start Taking Tasks: After onboarding, you can start picking up tasks from the Assets Request Board as described in the creators’ guidelines. You now have the green light to volunteer for requests in the Approved column. Make sure to always follow the board process even though you’re now an official creator.
- Ongoing Evaluation: Note that being an approved Content Creator is an ongoing role. Wizards may periodically review creators’ performance. Consistently good work means you remain in good standing (and might get perks or higher-value assignments). If someone repeatedly fails to deliver or violates guidelines, Wizards might remove them from the creator list. This is rare and avoided by selecting good applicants and giving feedback, but it’s part of maintaining quality.
By following this application process, the community ensures that those who produce content have demonstrated their ability and commitment. For applicants, it’s a chance to show your passion and skills. Once on the team, you become a crucial part of educating and growing the GRIDNET community while earning rewards for your contributions.
Roles and Responsibilities of Wizards
Wizards act as facilitators and gatekeepers on the Assets Request Board. They have special permissions and responsibilities to ensure the system runs smoothly and fairly:
- Moderating New Requests: Wizards regularly monitor the New Request column. For each incoming request, they verify that it’s clear, relevant to the community, and not a duplicate of existing content. If a request is unclear or missing information, we will comment to ask the requester for clarification or additional details (and may @mention the requester to get their attention). They might also make minor edits to the card (formatting, tagging) to ensure it fits the template and standards.
- Approval or Rejection Decisions: Wizards decide which requests get approved. Criteria may include usefulness to the community, alignment with current goals or topics of interest, and feasibility (do we have creators with the necessary skills/time?). If approved, a wizard moves the card to the Approved column, and updates the card with the reward amount and any notes. If a request is rejected or put on hold, one of us moves it to Closed/Rejected (or leaves it in New Request with an explanatory comment) and provides a polite explanation. For example: “Rejected – a similar tutorial already exists” or “On hold – awaiting more details from requester.”
- Setting Reward Amounts: For each approved request, Wizards determine an appropriate reward in GNC for the task, based on its complexity and the effort required. They should be fair and perhaps follow a guideline or budget. (For instance, a simple graphic might have a smaller reward than a full video tutorial.) The reward is clearly noted on the card so that any potential Content Creator knows the incentive upfront. All rewards are paid only after successful completion and approval of the content.
- Assigning Tasks to Creators: Wizards oversee the assignment of tasks to Content Creators. They ensure that only approved Content Creators take on tasks. When a creator volunteers for a task via a comment, a wizard will typically confirm by assigning that creator: they might reply “Okay, @CreatorName you’ve got it,” then move the card to In Progress and update the “Assigned Content Creator” field. If multiple creators offer, Wizards decide who to assign – they might consider the first volunteer, or choose based on expertise or current workload. (Wizards aim to be fair and transparent in these choices, possibly explaining in a comment like “Assigning to @Alice as she has relevant design experience. @Bob, we’ll have more tasks coming up!”). Sometimes, for high-priority tasks, Wizards might directly approach a specific creator they know is best suited or available.
- Supervising Work in Progress: While content is being created, Wizards keep an eye on the Assigned & In Progress column. They check that progress updates are coming in and intervene if a card seems stalled. If a deadline is looming or past, a Wizard will follow up with the Content Creator via comment or direct message. In case a Content Creator becomes unresponsive or cannot complete the task, Wizards have to make a call: either extend the deadline, find another creator to take over (reassign the card), or in rare cases, move the card back to Approved (open for others) or Closed if it’s not going to be done. Their role is to keep things moving toward completion.
- Reviewing and Quality Control: When a card is in Ready for Review, Wizards (often the one who approved/assigned it, or another with relevant knowledge) meticulously review the submitted content. They verify that it fulfills the request, is factually correct, and meets quality standards. If the content is good, they approve it. If it needs work, they compile clear, actionable feedback in the comments. Wizards might also loop in the original requester for their input if needed (“@RequesterName, does this meet what you were looking for?”). They ensure that any feedback is constructive and that the Content Creator knows exactly what to address in a revision. This may involve multiple review iterations, and Wizards coordinate this efficiently.
- Approving Completion: Once satisfied with the content, a Wizard will mark the task as completed. They move the card to Completed and update the status in the description (as per the template) to indicate approval. They also make sure the content is delivered to wherever it needs to go. For example, if the asset is a video that should be published on an official channel, a Wizard might handle that upload or coordinate with the team responsible. If it’s an infographic, they might add it to the community wiki or resources page. While this step might be outside the board’s direct scope, noting the outcome (where the content ended up) on the card is good practice.
- Reward Distribution: Wizards are responsible for distributing the promised GNC rewards to Content Creators once a task is completed. This involves initiating the token transfer from the community treasury or a rewards wallet. Wizards should follow whatever internal procedure exists for payments (which might require a second sign-off or a multi-sig transaction if it’s a DAO-like setup). Once done, they update the card (in the Completed template) with confirmation of payment (and possibly transaction details for transparency). This closes the loop, showing that the creator was compensated as agreed.
- Board Maintenance and Oversight: Beyond individual tasks, Wizards maintain the board’s overall health. They ensure tags are used consistently and might refine tag categories over time. They archive or clean up old cards if the Completed column becomes too large (maybe moving very old completed cards to an archive board or changing their visibility). They also update any instructions on the board if processes change. For example, if a new type of asset becomes common (say, interactive demos), they might add a tag for it and mention it in the guidelines. Wizards could also periodically summarize board activity to the wider community (e.g., “Monthly update: 5 assets created and delivered this month!”), showcasing the productive output of the system.
- Handling Conflicts or Issues: If any conflicts arise (e.g., a requester is unhappy with the final content, or a creator disputes the amount of reward given), Wizards mediate and resolve the issue. They will refer to these guidelines and community rules. For instance, if a requester feels their request wasn’t fully met even after revisions, a Wizard could discuss possible remedies (perhaps scheduling a follow-up asset or adjusting the content). If a Content Creator feels under-rewarded due to extra work, Wizards can consider a bonus or at least note the feedback for future reward calculations. The goal is to keep all parties satisfied and maintain a spirit of fairness.
In summary, Wizards act as project managers and quality control for the Assets Request Board. Their active involvement at each stage (from vetting requests to final payout) is key to making the pipeline work. They ensure that the board remains a trusted system where good content is created efficiently and everyone’s contributions are respected and rewarded.
Tags and Filters for Asset Categorization
To keep the Assets Request Board organized and easily navigable, we use tags (labels) on cards to categorize each request. Tags help filter and search for specific types of tasks or content. Here are the recommended tag categories and examples of each:
Asset Type: Tag the format of the content. Examples: Graphic, Video, Article, Tutorial, Infographic, Animation, etc. This allows anyone to quickly see what form the requested asset will take. (For instance, a card tagged Video vs. one tagged Infographic might be picked up by different creators specialized in those areas.)
Difficulty/Level: Tag the intended audience skill level or complexity. Common tags: Beginner, Intermediate, Advanced. Use Beginner for content that explains basic concepts or is for newcomers; use Advanced for in-depth or technical content targeting experienced users. These tags help content creators gauge if a task aligns with their ability to simplify or elaborate on topics appropriately.
Language: If the community is multi-lingual, tag the language of the content. Examples: English, Spanish, Polish, Mandarin, etc. A request might even have multiple language tags if versions in different languages are needed. Language tags help in assigning creators who are fluent in those languages, and they allow community members to filter requests or completed assets by language.
Topic/Category: (Optional, but very useful) Tag the subject matter or domain of the content. Examples might include GridScript (if the content relates to GRIDNET’s scripting language), Wallet, Governance, DeFi, Security, Tutorial-Series, etc. These tags will depend on common themes in the GRIDNET ecosystem. Topic tags group related content together and help creators with domain expertise find tasks that suit them.
Priority/Urgency: If needed, use tags like Urgent or High Priority for tasks that have a time constraint or are particularly important. For example, a tutorial needed before an upcoming event or a graphic for an imminent announcement might be tagged urgent. This signals to creators that a task should be handled ASAP. (Wizards will assign these sparingly to keep everything from seeming high priority.)
Using tags: Requesters are encouraged to add relevant tags when creating the card (Deck app allows adding labels to cards). Wizards will review tags upon approval and adjust for consistency (they might have a standard set of label colors/names). Content Creators can also suggest adding a tag if they see something missing or if the scope changes. On the Deck board, tags will appear as colored labels on each card, and users can filter the view by tag (for example, view only Graphic tasks or only Completed tasks tagged Beginner to find intro-level materials).
Having a robust tagging system makes it much easier to navigate the board. For instance:
- A new Content Creator who specializes in video might filter by the
Videotag to see all video requests. - A community member looking for resources might filter the Completed column by
TutorialandBeginnertags to find all beginner tutorials that have been made. - Wizards could use tags to generate reports (e.g., how many
Spanishcontent pieces have been requested/completed).
Tags are an optional organizational tool, but when used consistently they greatly enhance the usability of the board.
Communication and Collaboration Expectations
Effective communication is crucial for a collaborative board like this. We emphasize transparency and openness so that everyone (requesters, creators, Wizards, and the wider community) can follow along. Here’s what is expected:
- Use Deck Comments as the Primary Channel: Each card’s comment thread is the main channel for discussing that specific task. All significant interactions – clarifying questions, status updates, feedback, decisions – should happen in the comments. This keeps a written record tied to the task, which is helpful for accountability and for anyone later reviewing what was done. It also means information isn’t lost in private chats and everyone involved with the task stays informed.
- Default to Public Communication: Since the board is publicly viewable, assume that anything you write on a card can be seen by the entire community. This is good for transparency: everyone sees what was requested, how it’s being addressed, and the outcome. It also encourages a respectful tone. Keep discussions constructive and professional. If you need to communicate sensitive information (e.g., sharing a private link or personal data), consider whether the card comment is appropriate or if a private message is better – but in general, keep things open.
- Mention People for Clarity: The Deck app supports @mentions (or at least tagging users by name). Use these to direct comments to specific individuals when needed. For example, a Content Creator might write, “@WizardAlice I have a question about this requirement…” or a Wizard might write, “@CreatorBob please provide an update on your progress.” Mentions trigger notifications and ensure the comment isn’t missed by the intended party. Be mindful not to overuse mentions; use them when a response or action is needed from that person.
- Use Talk (Chat) for Real-Time if Needed: Basecamp likely has an integrated chat (Talk). While the persistent record should live in Deck comments, sometimes a quick real-time chat can resolve issues faster (for brainstorming, troubleshooting technical issues, etc.). It’s fine to use Talk or direct messages for these quick sync-ups, especially among Wizards and creators. However, if any decision or important info comes out of a chat, summarize it back in the card comments. For example: “(From our Talk discussion: We’ll proceed by splitting the video into two parts to make it easier to follow.)“. This ensures the knowledge is captured on the board.
- Regular Updates: Content Creators should provide updates at key milestones, as noted earlier. Wizards should also communicate any changes (like if a deadline is extended or a requirement changes). Regular small updates prevent people from wondering about the status. Even a quick “Progress is on track, just editing now” comment is helpful. Requesters typically won’t need to update much, but if their needs change or if they have additional input, they should voice it as soon as possible in the comments.
- Respectful Feedback Loops: When giving feedback (Wizards/requesters to creators), be specific and respectful. Comment on the work, not the person. For example, “The intro section is a bit too technical for beginners; could we simplify the language?” is constructive, whereas “This write-up is bad” is not helpful. Content Creators should also feel free to ask for clarification on feedback if something is unclear (“@WizardBob when you say more explanation in step 3, do you mean adding an example?”). Keeping this dialog respectful and clear ensures revisions go smoothly and learning happens on all sides.
- Stay On-Topic: Keep the conversation in each card focused on that asset request. Tangential discussions should be moved elsewhere (general chat or a different card if it spawns a new idea). This helps maintain clarity. For instance, if a new idea comes up during discussion, a Wizard might say “That’s a great idea, let’s make a separate request for it so we don’t derail this task.”
- Conflict Resolution: In the rare case of conflict (e.g., differing opinions on how to approach content or dissatisfaction with results), try to resolve it in comments with an open mind. Wizards will moderate if needed to reach a resolution. The public nature of the board means everyone should strive to be reasonable. Often, referring back to the original request or the guidelines can ground the discussion (“Our goal is to make this beginner-friendly, so let’s prioritize simplicity over depth in this tutorial.”).
In summary, communicate openly, clearly, and respectfully. The Deck comments are the heartbeat of the board’s collaboration. By keeping most communication in one visible place, we ensure transparency and collective understanding. Optional side chats are fine for convenience, but the outcome of those should always loop back to the card. This way, anyone can read a card from top to bottom and understand the full story of that asset’s creation.
Example Workflow: From Request to Reward
To illustrate how the board functions, here’s an example scenario showing a request moving through the pipeline with all roles involved:
- Request Submission: Alice, a community member, wants a tutorial infographic about setting up a GRIDNET node. She goes to the Assets Request Board and creates a card in New Request with the title “Infographic: How to Set Up a GRIDNET Node”. She fills in the template: describes that she wants a step-by-step graphic, tags it as
Graphic+Beginner+English, and explains it’s for new users who prefer visual guides. - Wizards’ Review and Approval: Bob, one of the Wizards, reviews Alice’s request. He sees it’s not a duplicate and would be useful for onboarding. He moves the card to Approved, and updates the description to add Reward: 50 GNC. He also notes in Status that it’s approved on today’s date, and sets Priority: High (because an upcoming workshop could use this). In a comment, Bob writes, “Approved – this will be great for newcomers. Looking for a Content Creator to take it on! (Need it in 2 weeks for the workshop.)”
- Content Creator Volunteers: Carol, an approved Content Creator with graphic design skills, checks the board and sees the new approved request. In the comments, she writes: “@Bob I’d like to work on this infographic. I have experience making node setup guides. I can start right away and have a draft in a week.” This signals her interest publicly.
- Assignment by Wizard: Bob confirms Carol as the assignee. He replies in a comment, “Great, @Carol, it’s yours! Thanks for taking this on.” He then moves the card to Assigned & In Progress. In the card description, Bob adds “Assigned to Carol on [date], deadline Sept 30 (one week for draft, another for revisions before workshop)” in the Deadline/Progress field. Now everyone knows Carol is working on it and by when.
- Work in Progress Updates: Carol begins working on the infographic. She creates a checklist on the card (e.g., “1. Outline content, 2. Design draft, 3. Review with team, 4. Finalize graphic”). A couple of days in, Carol checks off “Outline content” and comments, “Outline done, starting on design layout now.” The next day, she comments again, “Halfway through the design, here’s a quick question: @Alice Should I include a section on system requirements, or keep it simple?” Alice (the requester) responds in a comment, “Include basic requirements, yes, that would help newbies.” This collaboration ensures the work meets the requester’s expectations.
- Content Submission for Review: By the end of the week, Carol finishes the draft infographic. She uploads the image file to the card (or a share link if it’s large) and updates the description’s Deliverables with “Draft infographic image uploaded above.” She then moves the checklist item “Design draft” to done and comments, “@Bob @Alice The draft is ready for review. Please take a look and let me know your thoughts.” The card is now effectively in Ready for Review (Bob or another Wizard moves it officially, or Bob just knows to review it now).
- Review and Feedback: Dan, another Wizard with an eye for content, joins Bob in reviewing the infographic. Bob notices the port number for connecting the node is missing, and Dan thinks the layout might benefit from a simpler step-by-step numbering. Bob comments, “Looks awesome overall! Two things: (1) Could you add the default port number in the network section? (2) Maybe number the steps 1-5 to make it even clearer.” Alice, the requester, also gives feedback: “This is great, just a minor spelling correction: ‘Initialize’ is misspelled in step 3.” Carol responds, “Thanks for the feedback, on it! 😃”. She then makes the requested changes on her computer.
- Re-submission and Approval: Carol uploads the revised infographic, replacing the old image (and notes “Updated image uploaded” in the Deliverables). She comments, “I’ve added the port number, numbered the steps, and fixed the spelling. @Bob @Dan please review the updated version.” Bob checks the new image and everything looks perfect now. He comments, “All set now, looks perfect. Thank you Carol!” A Wizard (Bob or Dan) moves the card to Completed, and updates the status: “Completed – approved on [date].”
- Payment and Acknowledgment: After marking it Completed, Bob initiates the reward payment of 50 GNC to Carol’s wallet. He then edits the Reward Payment field on the card: “50 GNC transferred to Carol on [date] (Tx ID: …)” and comments “Reward sent. 🎉 Great work @Carol, and thanks @Alice for the request!” Carol replies with a thank you, and Alice expresses her excitement to share the infographic at the workshop. The task is now fully closed out.
This example shows the full lifecycle of a request through the board: a clear request, active Wizard facilitation, a Content Creator’s work and communication, collaborative review with the requester and Wizards, and final delivery with reward. All of it happened transparently on the board, with each stage clearly indicated by the card’s column and updates.
Public-Facing Project Incubation Board

Board Name: Project Incubation (Public)
Purpose: This board serves as an open incubator for community-submitted development ideas and GNC funding proposals. It supports all project types – from UI dApps and integrations to developer tools – and guides them through an 8-stage workflow from initial proposal to funded project. The board is visible to everyone (readable by the public), and community members can create and edit their own cards, comment on others, and participate in proposal evaluation (including voting via polls when deployed). Internal Wizards oversee the process, helping to move proposals through stages and ensure integrity. This openness lets the community directly influence project direction, embodying decentralized governance by allowing bottom-up contributions and feedback.
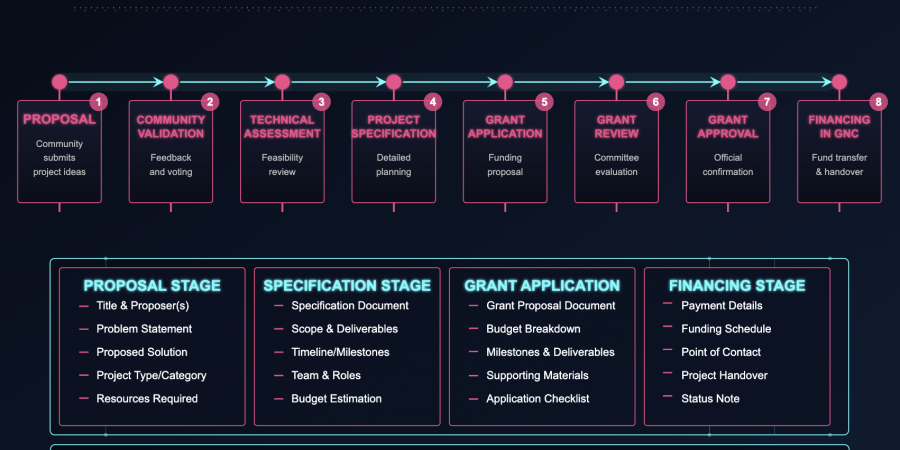
Board Structure: 8-Stage Workflow
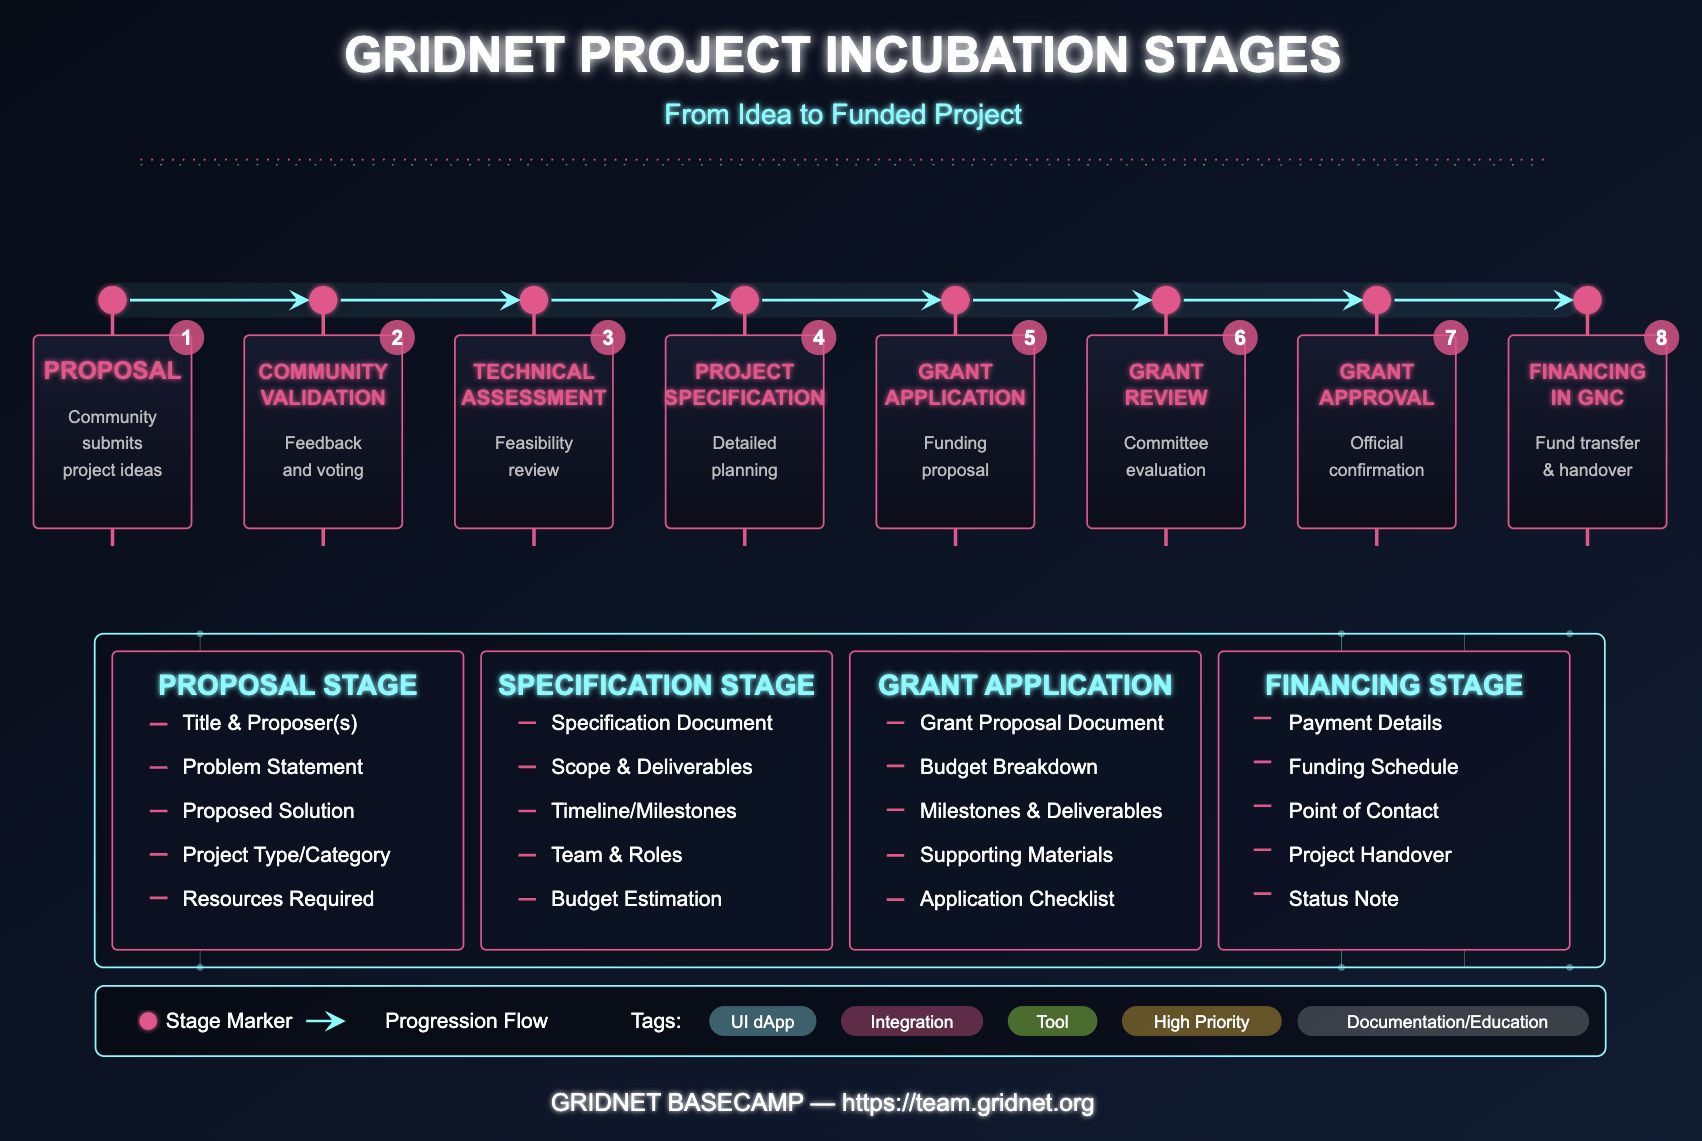
The Project Incubation board is organized into eight sequential lists (columns), each representing a key stage in the project development and funding lifecycle. A card (proposal) will move through these lists as it matures. Below are the lists and their purposes, along with a template of what information each card should contain at that stage:
1. Proposal (Ideation Stage)
Purpose: The Proposal list is the entry point for all new ideas. Community members submit their project proposals here to kick off the incubation process. This stage is all about capturing the what and why of the idea.
Card Template (Proposal): When creating a card in the Proposal column, the proposer should include:
- Title: A concise project name or title.
- Proposer(s): Name or username of the proposer (and team, if any).
- Summary: A brief overview of the idea, its goals, and expected impact.
- Problem Statement: The problem or need the project addresses.
- Proposed Solution: Description of the solution or approach being suggested.
- Project Type/Category: What type of project it is (e.g. UI dApp, Integration, Tool – can also be indicated with a tag).
- Resources Required (Optional): Any specific resources or support needed (funding, expertise, etc.).
- References/Links (Optional): Links to related discussions, documents, or prior work (if any).
How it works: A community member creates a card with the above details, giving enough information for others to understand the idea. The card represents a live proposal that others can now see and comment on. This stage encourages open innovation – anyone in the community can put forward a creative idea. At this point, the idea is informal; the emphasis is on clarity of the concept and its value to the ecosystem. If the proposal is unclear or incomplete, Wizards may assist the proposer to refine the card so that it’s ready for the next stage.
2. Community Validation (Feedback & Discussion)
Purpose: Once a proposal has been put forward, it moves into Community Validation. This stage opens the floor for community feedback, discussion, and initial validation of the idea’s merit. Decentralized governance comes to life here as community members collectively evaluate proposals.
What happens here: In this list, community members review the proposal. They use Deck’s commenting feature to discuss the idea, ask questions, and offer suggestions. The goal is to gauge public interest and improve the proposal through crowd input. In some cases, a poll may be attached to the card (for example, a link to a Bootcamp Poll or an on-chain voting mechanism) to formally measure community support or rank priorities. For instance, a simple poll might ask “Should this project move forward to technical assessment?” with yes/no options.
Card Template (Community Validation): As the card evolves in this stage, it should be updated with:
- Community Feedback Summary: A running summary or list of key points from the discussion (maintained by the proposer or a moderator). For example, note common questions, any proposed changes, or general sentiment (e.g. “5 comments in support, 1 concern about feasibility”).
- Poll Results (if applicable): If a vote was conducted, record the outcome (e.g. 85% of community voters support moving forward).
- Proposer’s Response: The proposer can update the card description to address major feedback, clarifying how they will adjust the idea or providing answers to questions.
How it contributes: This stage ensures the proposal has community buy-in before resources are spent on it. It leverages the wisdom of the crowd for validation. A strong positive response (lots of upvotes or supportive comments) signals the project is worth pursuing, whereas lukewarm interest or unresolved criticisms might signal caution. By the end of Community Validation, the proposal should be more refined and have a clear indication of community sentiment. Wizards or moderators will look for a consensus or at least a constructive discussion before advancing the card. If the idea passes this community review, it proceeds to the next stage. (If it fails to gain support or the proposer withdraws it, the card may be moved to an archive or “Closed” list for record-keeping.)
3. Technical Assessment (Feasibility Review)
Purpose: In the Technical Assessment stage, the proposal is examined for feasibility and technical soundness. While the community can provide input, this phase is primarily handled by experienced developers or domain experts (the internal Wizards team or appointed reviewers). This adds a layer of expert governance to ensure the project is viable and aligns with GRIDNET’s technology stack and standards.
What happens here: A designated technical reviewer is assigned to the card (using Deck’s card assignment feature, the reviewer’s name/avatar will be attached to the card). The reviewer conducts due diligence on the proposal’s technical aspects. This may involve checking the proposed solution’s architecture, identifying potential challenges, security concerns, or resource requirements, and evaluating whether the idea is realistically achievable with the available technology. The outcome can be suggestions to modify the approach, an endorsement of technical viability, or in some cases, a recommendation not to proceed if there are insurmountable issues.
Card Template (Technical Assessment): The card’s description or comments should be updated by the reviewer with a Technical Evaluation section, including:
- Feasibility Analysis: Notes on how the project can be implemented. E.g., which platform or language it would use, any required integration with existing systems, etc.
- Challenges & Risks: Identification of technical risks or uncertainties (for example, “requires significant computational resources” or “dependency on unreleased API”).
- Recommendations: Suggestions for improvements or adjustments (like using a different approach to solve the problem, or phasing the project).
- Technical Green Light: A clear statement of whether the project is technically Approved to move forward, Needs Revisions, or Not Feasible. This can be a brief conclusion in the card (e.g., “Approved to proceed – no major blockers identified” or “Not recommended: relies on unsupported tech”).
Result: This stage injects expert oversight, ensuring that enthusiasm is tempered with practicality. If the technical assessment is positive, the card moves on. If issues are found, the proposer might be asked to revise the proposal or it could be put on hold. By performing this in the open (the card is still on a public board), the community gains insight into the reasoning, which builds trust. It also invites technically skilled community members to weigh in if they have knowledge, further decentralizing the expertise involved.
4. Project Specification (Detailed Planning)
Purpose: After passing technical vetting, the idea enters Project Specification. The aim here is to develop a full project plan and specification before any funding is requested. This stage turns a validated idea into a concrete blueprint, ensuring all details are fleshed out. It’s a collaborative effort – the proposer, Wizards, and other contributors might work together on the specifics.
What happens here: The card in the Project Specification list represents a draft of the full project plan. The proposer (or project team) will expand the proposal into a detailed specification document. This may be done in a shared document (like a Bootcamp document or markdown file) linked or attached to the card. The specification should cover exactly what will be built, how, and by whom, serving as a single source of truth for the project’s scope.
Card Template (Project Specification): At this stage, the card should include or link to:
- Specification Document: A link or attachment to a detailed spec (could be a Bootcamp doc). This document typically includes sections such as Objective, Functional Requirements, Technical Architecture, and User Experience details if applicable.
- Scope & Deliverables: A clear list of what the project will deliver (features, components, outputs). For example, “Deliverable 1: Web UI for X, Deliverable 2: Smart contract Y…”
- Timeline/Milestones: An estimated timeline divided into milestones. E.g., “Month 1: Prototype, Month 2: MVP release, Month 3: Testing…” Each milestone might later tie to funding tranches.
- Team & Roles: Identify who will work on the project. List confirmed team members or note if contributors are needed for certain roles (developer, designer, etc.). Community members might volunteer here if the project needs help.
- Initial Budget Estimation: A rough estimate of resources needed (not the formal request yet, but an outline: e.g., “Approximately 1000 GNC for development over 3 months”).
- Risks & Dependencies: Any outstanding risks or dependencies (e.g., “Waiting on API release in next SDK” or “Need partnership with X for data”).
How it contributes: The Project Specification stage is crucial for project integrity and success. By planning thoroughly, it increases the project’s chance of delivering value and using funds effectively. This stage also demonstrates transparency – the entire community can see the detailed plan and provide final input or spot issues (via comments on the card or the spec document). It encourages would-be collaborators from the community to join the effort if they see a well-defined plan. Once the specification is solid and agreed upon by the proposer and relevant experts, the project is ready to seek funding.
5. Grant Application Preparation (Funding Proposal)
Purpose: In this stage, the team prepares a formal Grant Application for the project, based on the specification. This is a packaging of the project plan into a format required by the funding body (e.g., GRIDNET’s grant committee or a DAO funding process). It translates the plan into a request for resources (GNC tokens) and commitments to deliverables.
What happens here: The card moves to Grant Application Preparation once the project spec is ready. The proposer (with possible help from Wizards or a grants support team) compiles all required information into the standard grant proposal format. This might involve filling out a grant template form, writing a cover letter, or creating slides – whatever the process requires. It’s an internal preparation phase, but on this public board the community can still follow along and offer last-minute suggestions if needed.
Card Template (Grant Application): The card at this stage should track the tasks and content of the application, such as:
- Grant Proposal Document: A link to the completed grant application (for example, a PDF or form output). This document typically includes an executive summary of the project, background of the team, the detailed plan (from stage 4) condensed, and the funding request.
- Budget Breakdown: Clear itemization of the funding needs in GNC. E.g., personnel costs, equipment, audits, etc., totaling the requested amount. Each item should tie to parts of the project or milestones.
- Milestones & Deliverables: A reiteration of the project milestones, now framed as conditions for grant disbursement. For instance, “Milestone 1 (20% of funds): Completion of feature X by Date Y, deliverable: code on GitHub” and so on.
- Supporting Materials: Any extra materials required, such as team CVs, references to prior work, mockups or prototypes (if they have been developed early). These can be attached or linked in the card.
- Checklist of Application Steps: (Optional) A checklist in the card’s comment or description to ensure all application steps are done – e.g., “✅ Filled online application form,” “✅ Obtained 3 community endorsements,” “✅ Prepared demo video.”
How it contributes: This stage formalizes the project for funding, ensuring nothing is missing when the application goes to review. It demonstrates to the community that funding is requested based on a well-documented plan and fair budget, reinforcing trust. Even though this is a formal paperwork stage, doing it via the board keeps the process transparent – the community can see that the team is asking for X amount of GNC and what they promise in return. It also invites any community oversight (for example, if someone notices the budget is too high for a certain item, they could comment). By the end of this stage, the project is ready to be evaluated for approval.
6. Grant Review (Committee Evaluation)
Purpose: In the Grant Review stage, the submitted application is evaluated by the authorized decision-makers – for instance, GRIDNET’s grant committee, core team, or a governance council. This stage focuses on due diligence and deliberation on whether the project should receive funding. It’s a critical checkpoint to uphold accountability in fund allocation.
What happens here: The card is now in the hands of the reviewing body. Reviewers will read the grant proposal and possibly meet (offline or online) to discuss it. They will use the card to document their evaluation and any requests for clarification. Since this board is public, the review stage can also be partially transparent: while internal deliberations might happen privately, the outcomes and major feedback are recorded on the card for the community to see. This way, the community understands why a project was or wasn’t approved, which is vital for fair decentralized governance.
Card Template (Grant Review): As the review progresses, the card should be updated to reflect the review status:
- Reviewer Comments: A section where each reviewer (or the committee collectively) notes their comments or concerns. For example: “Reviewer A: Project aligns with our roadmap, good team. Reviewer B: Concerned about security aspects – require audit in plan. Reviewer C: Supports funding half now, half upon milestone 2.”
- Questions for Proposer: If the committee has questions, they can be listed here (and the proposer can answer in the card comments or by updating the application document). For example: “Please clarify how the maintenance of the dApp will be funded after grant.”
- Conditional Requirements: Any conditions the committee would require for approval. E.g., “Must add a detailed testing plan” or “Find an additional senior developer to co-lead the project.” These should be documented on the card so the proposer can respond.
- Status Indicator: An explicit note of the status, such as Under Review, Needs Revision, or Pending Decision. This can be simply written in the description or as a tag on the card like “Review In Progress”.
Transparency and outcome: Throughout Grant Review, the card acts as a transparent log of the evaluation. The community can observe that the proposal is being carefully vetted, which adds credibility to the process (no “black box” decisions). If the reviewers find significant issues, they may ask the proposer to move the card back to “Grant Application Preparation” to adjust the proposal (for example, revise the budget or scope) before resubmitting. Otherwise, once all concerns are resolved and if the consensus is positive, the committee will proceed to approval. (If ultimately rejected, the card would be moved to a “Rejected” or archive list with an explanation note, to close the loop publicly.)
7. Grant Approval (Decision Stage)
Purpose: This stage signifies that the project has been officially approved for a grant. It is the confirmation point where the governance process (community + committee) converges on a positive decision. Moving a card to Grant Approval list means the project will receive funding.
What happens here: The Grant Approval list holds cards that have passed review and are authorized to be funded. When a card reaches this list, it’s effectively a green light. Typically, a formal notification is given to the proposer (outside of Deck, perhaps via email or an announcement), but the Deck card is updated to mark the approval and outline the final terms. This stage is mostly a celebratory and record-keeping one on the public board, as the heavy lifting was done in review.
Card Template (Grant Approval): The card should be updated to record the approval details:
- Approval Date: The date when the grant was approved (and by whom, e.g., committee vote or executive sign-off).
- Approved Funding Amount: Confirm the amount of GNC to be awarded (this might match the request or be adjusted during review).
- Disbursement Plan: Note how the funds will be disbursed. E.g., “50% upfront, 50% after milestone 2 as per the grant agreement.” This ensures everyone knows the terms.
- Grant Agreement: If there’s a formal agreement or contract to sign, mention that it’s completed. Possibly link to a public statement or a hashed reference of the agreement for transparency.
- Next Steps: Outline immediate next steps for the team. For example, “Proposer to provide wallet address for GNC transfer” or “Onboarding to project management repository.” Also, encourage the team to start execution and maybe note that progress updates will be expected.
How it contributes: This stage on the board serves as an official public record of the approval. It demonstrates decentralized decision-making coming to fruition – an idea from the community made it through all checks and is now supported with resources. It also signals to the community which projects will be worked on, fostering a sense of collective achievement. By seeing the card in “Grant Approval,” other community members know this project is definitely happening, which might inspire collaboration or similar proposals. After logging these details, the card is ready to move to the final stage, triggering the actual funding transfer.
8. Financing in GNC (Funding & Handover)
Purpose: The final stage is Financing in GNC, where the approved grant is executed – i.e., funds are transferred in the GRIDNET Coin (GNC) cryptocurrency to the project team. This list holds projects that have been funded and are now in the implementation phase (often, work on them will continue outside this board or be tracked in a different project management space, but they remain here as a completed incubator item).
What happens here: Once the funding transaction is made, the card is moved to Financing in GNC to mark completion of the incubation pipeline. The emphasis is on documenting that the funds were delivered and the project is officially kicked off. This stage closes the loop of accountability: the community can verify that the promised funding was indeed given out, fulfilling the transparent governance cycle.
Card Template (Financing): Each card in this final column should include:
- Payment Details: Record of the funding transaction. For example, “Transferred 1000 GNC on 2025-03-01 to wallet address XYZ.” This could include a transaction ID or link to a block explorer for verification.
- Funding Schedule: If the funds are split into multiple payments, list the schedule (e.g., “Initial disbursement of 500 GNC done, remaining 500 GNC scheduled after milestone 2 in June 2025”). Mark completed payments with a check or note.
- Point of Contact: Identify who in the team or the foundation is responsible for financial coordination. E.g., “Treasurer: @wizard-alice facilitated the transfer.”
- Project Handover: Note where the project will be tracked going forward. Possibly link to a new Deck board, a GitHub repository, or a project page where development updates will occur. For instance, “Project development tracked on Project X Repo and monthly updates will be posted on forum.”
- Status Note: Confirm that the incubation process is complete. E.g., “Status: Funded and in progress (Incubation complete).”
Outcome: The card (and the board) has now served its purpose for this project. The project team will carry on with development, and the community can follow progress through the provided links or updates. The presence of this final stage in a public board is a powerful indicator of accountability in a decentralized system – it shows that not only was a decision made, but the execution (payment of funds) actually happened as approved. This fosters trust in the governance process because every step from idea to funding is visible and documented.
(Optional: It’s good practice for historical record to keep these funded cards on the board for a while, or move them to an “Completed Projects” archive column later, so anyone can review past funded proposals and their details.)
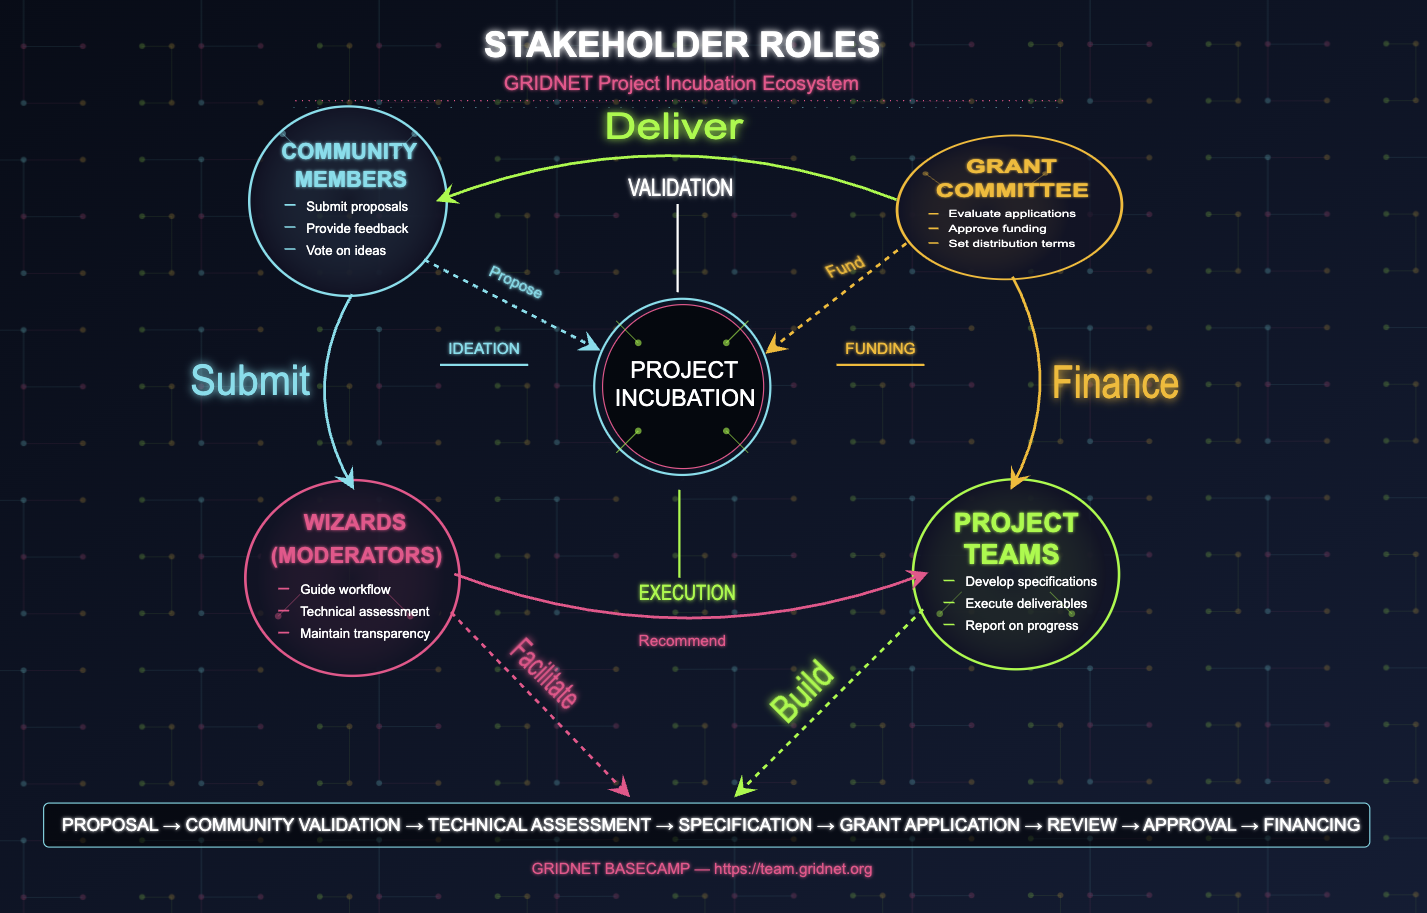
Useful Tags for Project Incubation Board
Tags in Deck help categorize and filter cards. For the Project Incubation board, we will use a set of tags to label proposals by type and other attributes. Tags ensure that users can quickly find specific kinds of projects or see the distribution of proposals. Some useful tags include:
- UI dApp – for user-facing decentralized applications (front-end projects, wallets, dApp UIs).
- Integration – for projects that integrate GRIDNET with other platforms or services (APIs, bridges, plugins).
- Tool/Utility – for developer tools, libraries, testing frameworks, or any utility that aids the ecosystem.
- Core Protocol – for proposals that involve changes or improvements to the core GRIDNET protocol or infrastructure.
- Documentation/Education – for projects focused on creating documentation, tutorials, or educational content.
- Research/Experiment – for exploratory projects or research initiatives that might not result in a product but add knowledge (e.g., a scalability study).
- Small Grant – (if applicable) to mark proposals requesting a small amount of funding, as defined by the community’s standards.
- Large Grant – to mark higher-budget proposals. This helps reviewers give appropriate scrutiny to big projects.
- High Priority – a tag that moderators can use if a proposal aligns with urgent ecosystem needs or strategic goals (this can signal to the community which ideas are especially important).
Each card can have multiple tags. For example, a proposal for a “Mobile Wallet dApp integrating GRIDNET with Hardware Wallets” might be tagged UI dApp and Integration. Tags are configured at the board level, and since Bootcamp Deck allows custom tags per board, we can maintain this list as the standard Using tags consistently will make it easier to filter proposals (Deck’s search can filter by tag), and color-coding tags can visually distinguish categories. This tagging system complements the stage columns by adding another dimension of information without cluttering the board.
Community Instructions and Usage Guidelines (Public Board)
Overview: The Project Incubation Board is open to all community members for proposing and developing project ideas. It operates under a set of guidelines to ensure a productive, respectful, and effective collaboration environment. Below is an overview of how to use this board, the rules of engagement, and tips for getting the most out of the incubation process.
How to Propose a Project:
- Submit a New Proposal: To propose a project, create a new card in the Proposal column. Only create one card per project. Give it a clear title and fill out the required details following the Proposal template (problem, solution, etc.). This information helps others understand and evaluate your idea.
- Use Tags Appropriately: Before saving your card, assign relevant tags (from the list of tags above). For example, tag your project’s category (dApp, integration, etc.). This is important for visibility – many people will browse by tags to find projects they are interested in.
- Do Not Edit Others’ Proposals: You are allowed to edit your own cards to refine your proposal, but please do not edit someone else’s proposal card without permission. Everyone should feel ownership over their idea. If you have suggestions, use comments instead of editing the description. Moderators (Wizards) may edit cards to format or clarify details, but they will usually comment first.
- One Proposal, One Card: Avoid duplicate proposals. If your idea is similar to an existing one, consider commenting on the existing card and perhaps collaborating, instead of creating a new card.
Engaging with Proposals (Community Feedback):
- Comment Constructively: If you see a proposal you like or have concerns about, click on the card and add a comment. Feedback should be constructive and courteous. For example, ask questions (“Have you considered using X approach?”), offer help (“I can assist with design if needed”), or express support (“This is a great idea, it would really help users like me”). Avoid vague criticisms – be specific and helpful.
- Voting: When a proposal is in Community Validation, look for a poll link or vote indicator in the card. Participate in polls to signal your support or concerns. Each community member typically has one vote per poll; use it to help good ideas rise. If no formal poll is provided, you can still show support by commenting “+1” or reacting if the platform allows (some integrations might enable emoji reactions).
- Spread the Word: It’s okay to share the link to a card with others in the community to draw more attention to it (e.g., in the forum or chat), but please keep discussion on the card or official channels so everything is documented.
- Respect and Moderation: Follow the community code of conduct. Harassment, spam, or off-topic comments will be removed. Wizards (moderators) will intervene if discussions become unproductive or disrespectful. Our goal is to maintain a welcoming environment for contributors of all experience levels.
Progressing Through Stages:
- Stay Informed: You can watch cards by subscribing or checking the board regularly. When a card moves to a new stage, it means it has passed certain checks (community validation, technical review, etc.). The card description will be updated at each stage with new information – make sure to read those updates if you’re following that project.
- Collaboration Opportunities: If a project reaches Project Specification and you have skills to contribute, comment to volunteer. Many proposals can become group efforts. This is encouraged – open-source development thrives on collaboration. The proposer can add collaborators by mentioning them or even by sharing access if needed (though by default any logged-in user can comment on the card).
- Role of Wizards: The Wizards team (core maintainers) helps facilitate this board. They might move cards to the next stage after verifying criteria are met, or help organize information. For example, once your proposal has a lot of community support, a Wizard will move it to Technical Assessment and assign an expert. Wizards also ensure that grant applications are complete before going to review. They are here to help the process, not to dominate it – final decisions rest on the structured process (community input and committee approval).
Board Rules & Integrity:
- Transparency: All major steps and decisions should be documented on the card. If you have an off-platform discussion (say a call to discuss the project), summarize the outcome in a comment so the community isn’t left in the dark. Transparency builds trust in this decentralized process.
- No Sensitive Personal Data: Do not post private personal information (like personal phone numbers, etc.) on this public board. Communication can be done via usernames and official channels. Remember this board is world-visible; keep the content professional and project-related.
- Intellectual Property: By submitting a proposal here, you agree that the idea (unless otherwise noted) is open for the community. Do not post proprietary ideas you aren’t willing to develop openly. The spirit is open-source – if you need to keep something secret, this public board isn’t the place.
- Conflict Resolution: If you disagree with a decision (e.g., your proposal wasn’t approved), you can ask for clarification on the card or in the community forum. There is a appeals or re-submission process: significantly revised proposals can be re-submitted or moved back to earlier stages, but coordinate with a Wizard to do so. We aim for fair consideration of all ideas.
How this Board Fosters Decentralized Governance: By following these guidelines, the Project Incubation board allows anyone in the community to have a voice in what gets built. Ideas are not top-down mandated; they emerge from the community and are evaluated in the open. Community members directly influence decisions through feedback and votes, aligning with decentralized governance principles. Meanwhile, the structured 8-stage pipeline ensures that each idea is responsibly vetted (for technical feasibility and impact) before community funds are spent, which protects the ecosystem from poorly planned projects. In summary, this board is a public square for innovation, where transparency and collaboration turn grassroots ideas into funded, actionable projects.