
You Already Know Everything You Need
Here is the single most important sentence in this entire article: if you can write HTML, CSS, and JavaScript, you can build a decentralized application for GRIDNET OS right now.
No new language. No proprietary framework. No six-month learning curve. You write the same <div>s, the same flexbox layouts, the same ES6 classes you have been writing for years — and your code runs inside a decentralized operating system backed by a blockchain. The blockchain is underneath, but you never touch it directly. You interact with it through CVMContext: a clean, familiar JavaScript singleton API. You call methods. You register callbacks. You await promises. That’s it.
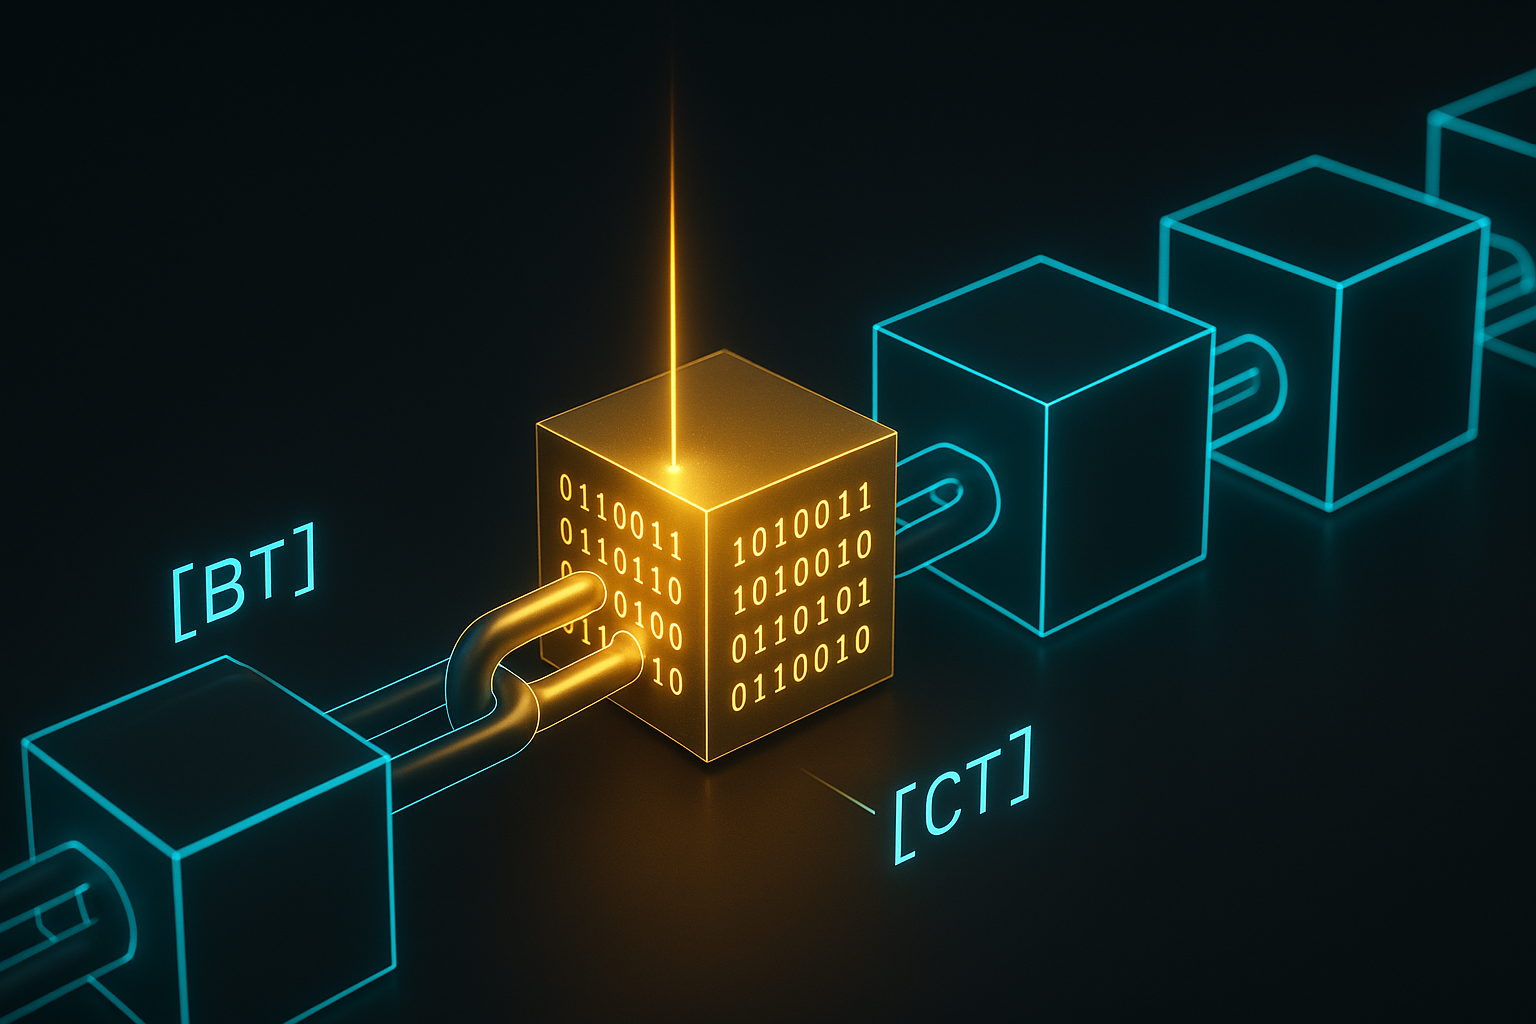
Even when you venture deeper — into GridScript, the native shell of GRIDNET OS — you will find yourself on familiar ground. GridScript commands mirror the Linux/DOS commands you already know: cd, ls, cat, rm, mkdir, touch, send. The transaction model uses BT/CT (Begin Transaction / Commit Transaction), which maps directly to BEGIN/COMMIT from SQL. Same concept, blockchain-backed.
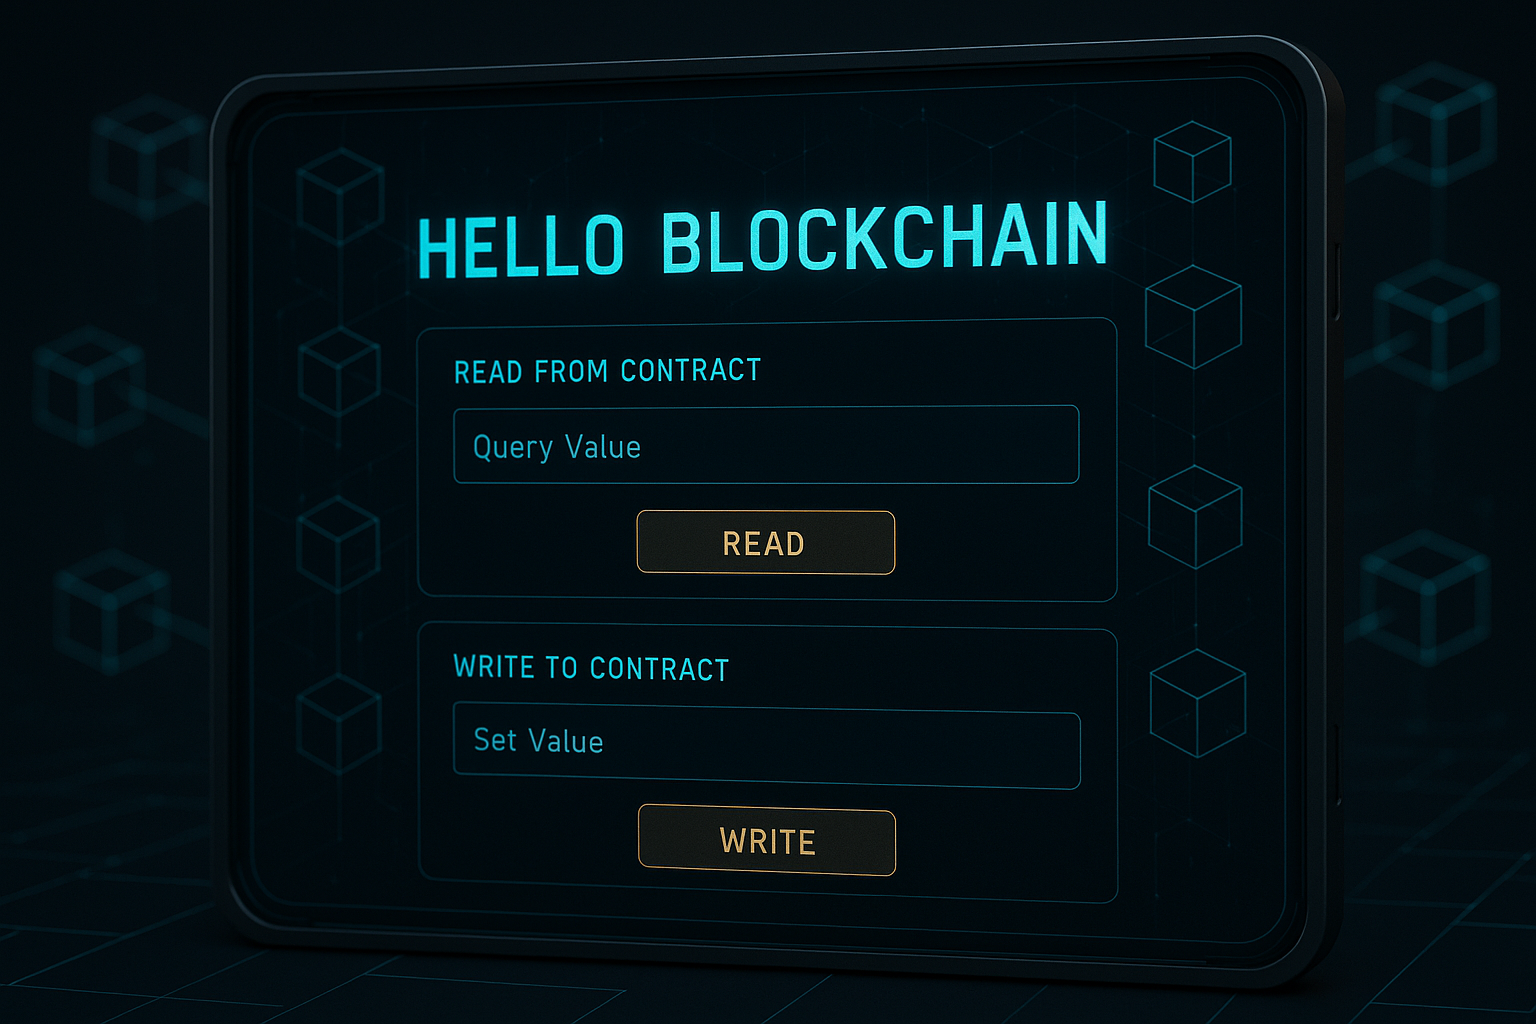
In the next thirty minutes, you will build a complete, working decentralized application — a “Hello Blockchain” dApp that reads data from and writes data to a real blockchain. Every step includes full, runnable code. No fragments. No “exercise left to the reader.” By the end, you will have a .app file you can deploy to the decentralized network.
Let’s begin.
Prerequisites: What You Need Before We Start
You need exactly four things:
- GRIDNET Core running. This is the full-node software that serves the GRIDNET OS web interface. Download it from gridnet.org and run it. The node will start a local web server (typically at
https://localhost) that hosts the entire decentralized operating system UI. - A GRIDNET OS account (identity). You must be logged in to write data to the blockchain. If you haven’t created an account yet, open the GRIDNET OS UI and use the Wallet dApp to generate a new identity. Reading data is public and free, but any write or commit operation requires an authenticated session with a valid cryptographic identity.
- A modern browser. Chromium-based (Chrome, Edge, Brave) or Firefox. The GRIDNET OS web interface uses standard Web APIs: Shadow DOM, ES6 modules, WebSocket, WebCrypto.
- A text editor. VS Code, Sublime, Notepad++ — anything you like. You will write a single JavaScript file.
That’s it. No npm. No node_modules. No build toolchain (unless you choose to use one for larger projects). For your first dApp, a text editor and a browser are all you need.
Optional but helpful: open the GRIDNET OS UI at https://ui.gridnet.org (the public instance) or your local https://localhost instance. Explore the desktop environment. Open the Terminal dApp and the File Manager. Get a feel for the windowed environment — because your application will live inside one of these windows.
Step 1: Create the HTML Skeleton — Shadow DOM and Scoped CSS

Every GRIDNET OS UI dApp is a JavaScript ES6 class that extends CWindow — the base class provided by the system at /lib/window.js. When your dApp is instantiated, CWindow creates a dedicated window on the desktop and renders your HTML content inside a Shadow DOM tree. This Shadow DOM is the key to everything: it isolates your styles, your DOM, and your scripts from every other dApp and from the OS shell itself.
Here is the complete skeleton of a GRIDNET OS dApp:
"use strict"

import { CWindow } from "/lib/window.js"

// ── HTML body for the dApp window ──────────────────────────────────
const myAppBody = `
<link rel="stylesheet" href="/css/windowDefault.css" />
<style>
  .container {
    display: flex;
    flex-direction: column;
    align-items: center;
    justify-content: center;
    height: 100%;
    width: 100%;
    padding: 1em;
    box-sizing: border-box;
    font-family: 'Rajdhani', sans-serif;
    color: #22fafc;
    background: linear-gradient(135deg, #0a0a14, #0d1a2d);
  }
  h1 {
    font-size: 1.8rem;
    margin-bottom: 0.5em;
    text-shadow: 0 0 15px rgba(34, 250, 252, 0.4);
  }
  .status {
    font-size: 0.9rem;
    color: #8892b0;
  }
</style>
<div class="container">
  <h1 id="title">Hello Blockchain</h1>
  <div class="status" id="status">Initializing...</div>
</div>
`;

// ── dApp class ─────────────────────────────────────────────────────
class CHelloBlockchain extends CWindow {

  constructor(positionX, positionY, width, height, data, dataType, filePath, thread) {
    super(positionX, positionY, width, height, myAppBody,
      "Hello Blockchain",       // window title
      CHelloBlockchain.getIcon(), // icon
      true                       // enable Shadow DOM
    );

    // Set a unique thread ID for this dApp instance.
    // Every dApp should set its own thread ID to avoid collisions
    // with other running dApps. The pattern is: PREFIX + process ID.
    this.setThreadID = 'HELLO_BLOCKCHAIN_' + this.getProcessID;
  }

  static getPackageID() {
    return "org.gridnetproject.UIdApps.helloBlockchain";
  }

  static getDefaultCategory() {
    return 'dApps';
  }

  static getIcon() {
    return ''; // Base64 data:image/png;base64,... goes here
  }

  open() {
    super.open();
    const status = this.getControl('status');
    status.textContent = 'dApp is running!';
  }

  closeWindow() {
    super.closeWindow();
  }
}

export default CHelloBlockchain;
Let’s break down what’s happening:
The HTML Body String
The myAppBody variable is a template literal containing your dApp’s entire HTML payload. This string is injected into the Shadow DOM when the window is created. Notice several critical patterns:
- The standard stylesheet link:
<link rel="stylesheet" href="/css/windowDefault.css" />imports the GRIDNET OS default window styles. Always include this. - Scoped
<style>block: Your CSS lives inside the HTML body. Because of Shadow DOM, these styles cannot leak out to other dApps, and no external styles can leak in. You have complete CSS isolation. - Percentage and em/rem units: Never use
vworvh. Your dApp does not own the viewport — it owns a window. Use%for layout dimensions relative to the window, andem/remfor typography and spacing. - Flexbox/Grid layouts: Use
display: flexordisplay: gridwith relative units. Your window can be resized, maximised, minimised, or snapped — your layout must adapt fluidly.
The Class
Your dApp class must extend CWindow. The CWindow base constructor takes four positional parameters: positionX, positionY, width, and height. However, the PackageManager may pass up to eight parameters when instantiating your dApp — the extra four are provided when the system launches your app in a file-associated context (e.g., the user double-clicks a file that your app handles):
positionX,positionY— initial window positionwidth,height— initial window dimensionsdata,dataType— optional data and its type (provided when opening a file with your app)filePath— optional file path context (the file that was opened)thread— optional thread reference
System dApps like Terminal only declare the four core parameters they need. For user-deployed dApps that handle file associations, you should accept all eight. The super() call passes the four positional parameters to CWindow along with your HTML body, the window title, your icon, and true to enable Shadow DOM (which you should always enable).
Key Methods You Must Implement
static getPackageID()— returns a unique reverse-domain identifier. For user-deployable dApps, start withorg.gridnetproject.UIdApps.static getIcon()— returns a Base64-encoded PNG icon string (data:image/png;base64,...). Can be empty during development.open()— called when the window has been created and is visible. This is where you initialise your UI, register event listeners, and start any background processes. Always callsuper.open()first.closeWindow()— called when the user closes the window. Clean up event listeners, stop threads, release resources. Always callsuper.closeWindow().
Accessing DOM Elements: The Shadow DOM Way
This is the most important rule in GRIDNET OS dApp development: never use document.getElementById() or document.querySelector(). These methods search the main document — the OS shell — not your Shadow DOM. They will not find your elements.
Instead, use:
this.getControl('elementId')— finds an element by itsidattribute within your Shadow DOMthis.getBody.querySelector('.my-class')— CSS selector scoped to your dApp’s bodythis.getBody.querySelectorAll('button')— all matching elements within your Shadow DOM
// ❌ BAD — searches the main document, finds nothing
const btn = document.getElementById('my-button'); // Returns null!

// ✅ GOOD — searches within your Shadow DOM
const btn = this.getControl('my-button');
const labels = this.getBody.querySelectorAll('.label');
CSS Rules — The Essentials
| ❌ Do NOT | Why | ✅ Do Instead |
|---|---|---|
Use vw or vh |
Relative to viewport, not your window | Use %, em, rem |
Use position: fixed |
Positions relative to viewport | Use relative/absolute within your container |
| Use external CDN stylesheets | Not available inside Shadow DOM | Inline all CSS in your body string |
Overuse !important |
Breaks cascade, hard to debug | Use specific selectors |
Step 2: Connect to the Blockchain via the CVMContext API
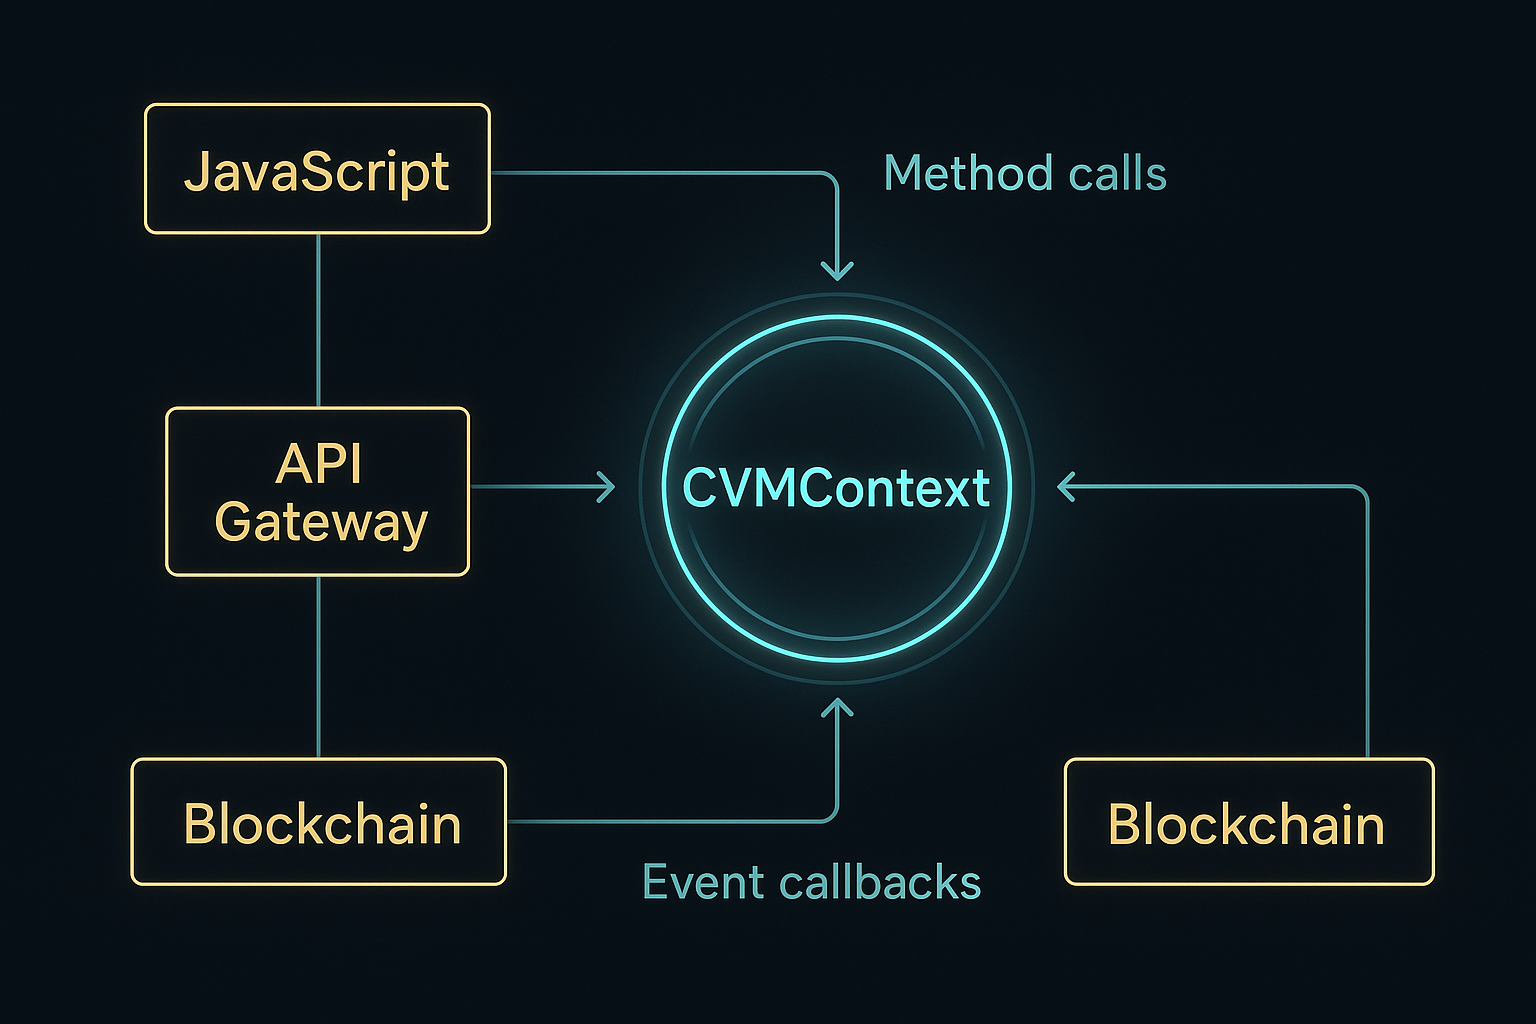
CVMContext is the singleton JavaScript object that bridges your dApp to the entire GRIDNET OS backend — blockchain, decentralized file system, networking, thread management, user identity, and more. It lives at /lib/VMContext.js and you access it with a single call:
const vmContext = CVMContext.getInstance();
That’s your gateway to the decentralized world. Let’s connect our Hello Blockchain dApp to it.
The Event-Driven Architecture
GRIDNET OS communication is event-driven. You don’t poll the blockchain. You register listener callbacks and the system notifies you when events occur. Here are the key listener types you’ll use:
Let’s upgrade our Hello Blockchain dApp to connect to the blockchain and monitor its state:
"use strict"

import { CWindow } from "/lib/window.js"
import { CVMMetaSection, CVMMetaEntry, CVMMetaGenerator, CVMMetaParser }
  from '/lib/MetaData.js'
import { CTools } from '/lib/tools.js'

const myAppBody = `
<link rel="stylesheet" href="/css/windowDefault.css" />
<style>
  .container {
    display: flex;
    flex-direction: column;
    height: 100%;
    width: 100%;
    padding: 1.5em;
    box-sizing: border-box;
    font-family: 'Rajdhani', sans-serif;
    color: #22fafc;
    background: linear-gradient(135deg, #0a0a14, #0d1a2d);
    overflow-y: auto;
  }
  h1 {
    font-size: 1.6rem;
    margin: 0 0 0.5em 0;
    text-shadow: 0 0 15px rgba(34, 250, 252, 0.4);
  }
  .status-bar {
    display: flex;
    gap: 1em;
    margin-bottom: 1em;
    flex-wrap: wrap;
  }
  .status-item {
    display: flex;
    align-items: center;
    gap: 0.4em;
    font-size: 0.85rem;
  }
  .dot {
    width: 0.6em;
    height: 0.6em;
    border-radius: 50%;
    background: #ff4444;
    transition: background 0.3s;
  }
  .dot.connected { background: #00ff88; box-shadow: 0 0 6px #00ff88; }
  .dot.vm-ready { background: #ffd700; box-shadow: 0 0 6px #ffd700; }
  .log {
    flex: 1;
    background: #0a0e1a;
    border: 1px solid #1a3a5c;
    border-radius: 6px;
    padding: 0.8em;
    font-family: monospace;
    font-size: 0.8rem;
    color: #8892b0;
    overflow-y: auto;
    white-space: pre-wrap;
    word-break: break-all;
  }
</style>
<div class="container">
  <h1>🔗 Hello Blockchain</h1>
  <div class="status-bar">
    <div class="status-item">
      <div class="dot" id="connDot"></div>
      <span id="connStatus">Disconnected</span>
    </div>
    <div class="status-item">
      <div class="dot" id="vmDot"></div>
      <span id="vmStatus">VM: Initializing</span>
    </div>
  </div>
  <div class="log" id="logArea">Waiting for connection...</div>
</div>
`;

class CHelloBlockchain extends CWindow {

  constructor(positionX, positionY, width, height, data, dataType, filePath, thread) {
    super(positionX, positionY, width, height, myAppBody,
      "Hello Blockchain", CHelloBlockchain.getIcon(), true);

    this.mTools = CTools.getInstance();
    this.mMetaParser = new CVMMetaParser();

    // Set a unique thread ID for this dApp instance
    this.setThreadID = 'HELLO_BLOCKCHAIN_' + this.getProcessID;

    // Register event listeners with CVMContext
    // The second parameter (this.mID) ties the listener to this window instance
    // so it can be automatically cleaned up when the window closes.
    CVMContext.getInstance().addConnectionStatusChangedListener(
      this.onConnectionChanged.bind(this), this.mID);
    CVMContext.getInstance().addVMStateChangedListener(
      this.onVMStateChanged.bind(this), this.mID);
    CVMContext.getInstance().addNewDFSMsgListener(
      this.onDFSMessage.bind(this), this.mID);
    CVMContext.getInstance().addVMMetaDataListener(
      this.onVMMetaData.bind(this), this.mID);
    CVMContext.getInstance().addNewGridScriptResultListener(
      this.onGridScriptResult.bind(this), this.mID);
  }

  static getPackageID() {
    return "org.gridnetproject.UIdApps.helloBlockchain";
  }

  static getDefaultCategory() { return 'dApps'; }
  static getIcon() { return ''; }

  // ── Lifecycle ──────────────────────────────────────────────────
  open() {
    super.open();
    this.log('Hello Blockchain dApp started.');
    this.log('Waiting for connection to GRIDNET Core...');

    // Check if already connected
    if (CVMContext.getInstance().getConnectionState == eConnectionState.connected) {
      this.onConnectionChanged({ state: eConnectionState.connected });
    }
  }

  closeWindow() {
    // Listeners registered with this.mID are auto-cleaned by CWindow
    super.closeWindow();
  }

  // ── Event Callbacks ────────────────────────────────────────────
  onConnectionChanged(event) {
    const dot = this.getControl('connDot');
    const label = this.getControl('connStatus');

    if (event.state == eConnectionState.connected) {
      dot.classList.add('connected');
      label.textContent = 'Connected';
      this.log('✅ Connected to GRIDNET Core!');
    } else if (event.state == eConnectionState.connecting) {
      label.textContent = 'Connecting...';
      this.log('🔄 Connecting...');
    } else {
      dot.classList.remove('connected');
      label.textContent = 'Disconnected';
      this.log('❌ Disconnected from node.');
    }
  }

  onVMStateChanged(event) {
    const dot = this.getControl('vmDot');
    const label = this.getControl('vmStatus');

    if (event.state == eVMState.ready || event.state == eVMState.synced) {
      dot.classList.add('vm-ready');
      label.textContent = 'VM: Ready';
      this.log('✅ Decentralized VM is ready!');
    } else if (event.state == eVMState.initializing) {
      label.textContent = 'VM: Initializing...';
      this.log('⏳ VM initializing...');
    }
  }

  onDFSMessage(dfsMsg) {
    // Check if this message is for us
    if (!this.hasNetworkRequestID(dfsMsg.getReqID)) return;
    this.log('📂 DFS response received (reqID: ' + dfsMsg.getReqID + ')');
  }

  onVMMetaData(metaMsg) {
    if (!this.hasNetworkRequestID(metaMsg.getReqID)) return;
    this.log('📡 VMMetaData received (reqID: ' + metaMsg.getReqID + ')');
  }

  onGridScriptResult(result) {
    if (result == null) return;
    this.log('⚡ GridScript result received.');
  }

  // ── Utility ────────────────────────────────────────────────────
  log(message) {
    const area = this.getControl('logArea');
    if (!area) return;
    const timestamp = new Date().toLocaleTimeString();
    area.textContent += '\n[' + timestamp + '] ' + message;
    area.scrollTop = area.scrollHeight;
  }
}

export default CHelloBlockchain;
This version demonstrates the core communication pattern:
- Register listeners in the constructor — always with
.bind(this)andthis.mID - React to events in callbacks — connection state changes, VM state changes, DFS messages, meta-data
- Check request ownership — use
this.hasNetworkRequestID(msg.getReqID)to verify that incoming data is the result of your query, not another dApp’s - Clean up in closeWindow() — listeners registered with
this.mIDare automatically cleaned up byCWindow
Step 3: Read Data — Navigate Domains, List Files, Read State
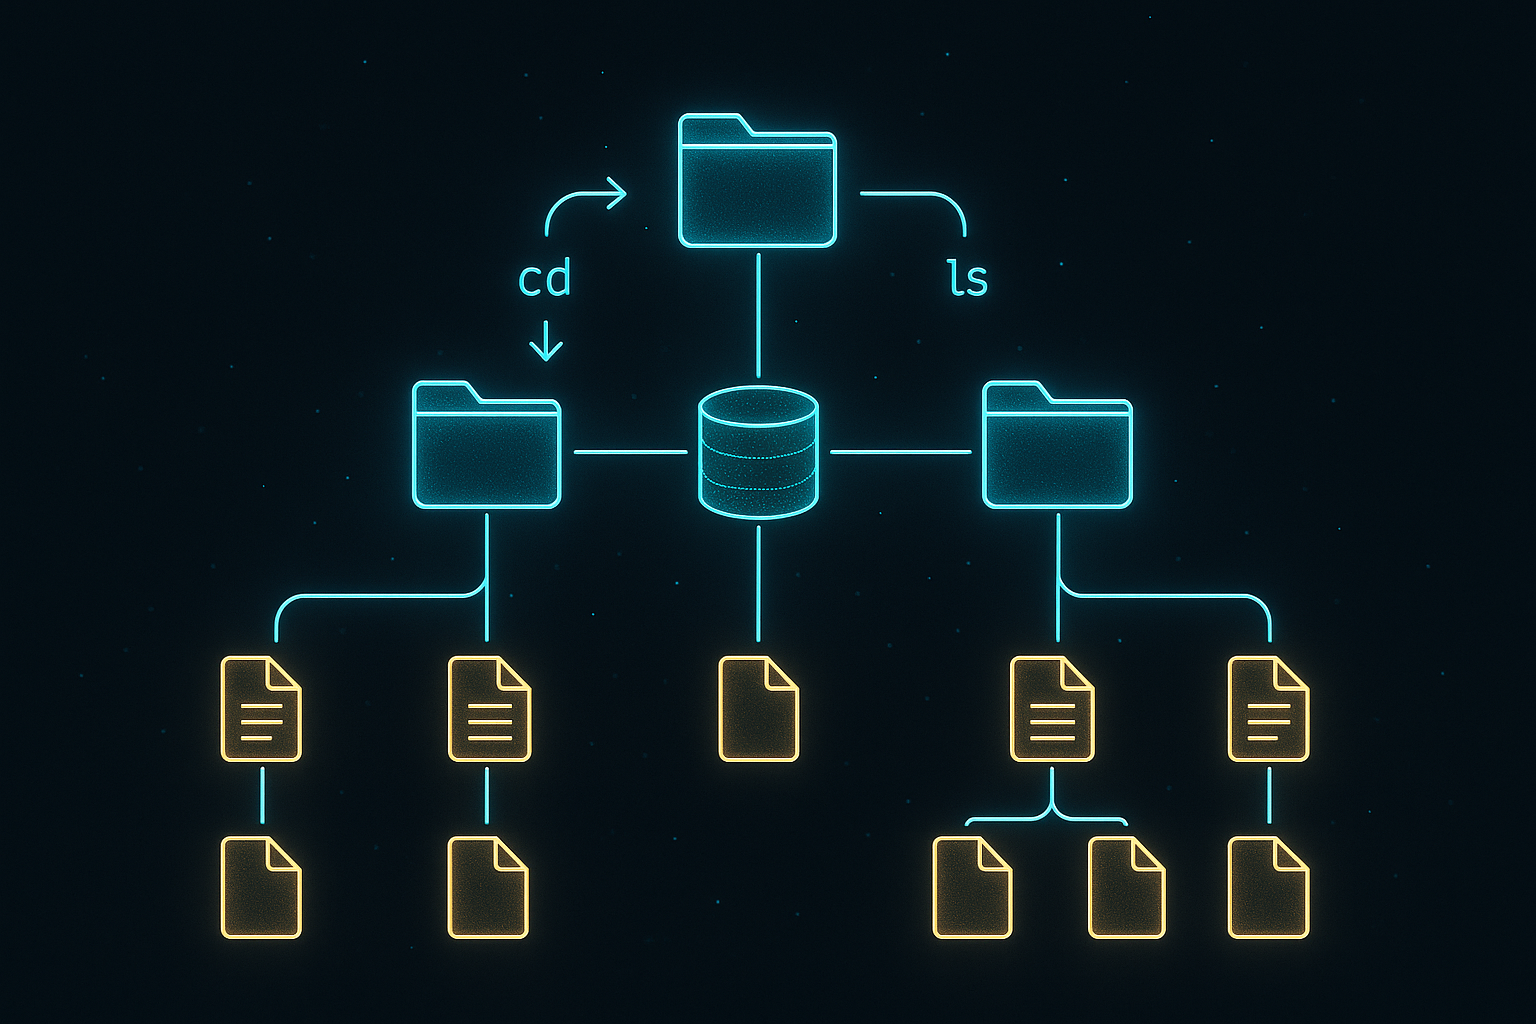
The GRIDNET OS Decentralized File System (DFS) is how data is stored on-chain. Every account (called a State Domain) has its own file system — directories, files, and metadata — all stored in Merkle Patricia Tries on the blockchain. Navigating this file system uses commands that will feel instantly familiar:
doCD(path)— change directory (equivalent tocd)doLS()— list directory contents (equivalent tols)doGetFile(path)— read a file (equivalent tocat)doNewDir(path)— create directory (equivalent tomkdir)doNewFile(path, content)— create/write a file (equivalent totouch+echo >)doCommit()— commit pending changes to the blockchaindoSync()— synchronize with the latest blockchain state
All file system operations go through CVMContext.getInstance().getFileSystem, which returns a CFileSystem singleton. Here’s how to read data:
// Navigate to the root of a state domain and list its contents
readBlockchainData() {
  const fs = CVMContext.getInstance().getFileSystem;

  // Step 1: Navigate to root directory
  // doCD returns an operation status with a request ID
  let cdResult = fs.doCD('/', true, false, false, this.getThreadID);

  // Track the request ID so we can identify the response
  this.addNetworkRequestID(cdResult.getReqID);

  this.log('📂 Navigating to root directory...');

  // The doCD with doLS=true also triggers a directory listing.
  // The results arrive asynchronously in our onDFSMessage callback.
}
The response arrives in your onDFSMessage callback. Here’s how to parse a directory listing:
onDFSMessage(dfsMsg) {
  // Verify this message is for us
  if (!this.hasNetworkRequestID(dfsMsg.getReqID)) return;

  if (dfsMsg.getData1.byteLength > 0) {
    let metaData = this.mMetaParser.parse(dfsMsg.getData1);

    if (metaData != 0) {
      let sections = this.mMetaParser.getSections;

      for (let i = 0; i < sections.length; i++) {
        let sType = sections[i].getType;

        // Directory listing response
        if (sType == eVMMetaSectionType.fileContents) {
          let entries = sections[i].getEntries;

          for (let a = 0; a < entries.length; a++) {
            let dataFields = entries[a].getFields;
            let entryType = entries[a].getType;

            if (entryType == eDFSElementType.directoryEntry) {
              let dirName = CTools.getInstance().arrayBufferToString(dataFields[1]);
              this.log('📁 Directory: ' + dirName);
            }
            else if (entryType == eDFSElementType.fileEntry) {
              let fileName = CTools.getInstance().arrayBufferToString(dataFields[1]);
              this.log('📄 File: ' + fileName);
            }
            else if (entryType == eDFSElementType.stateDomainEntry) {
              let domainName = CTools.getInstance().arrayBufferToString(dataFields[1]);
              this.log('🌐 State Domain: ' + domainName);
            }
            else if (entryType == eDFSElementType.fileContent) {
              let fileName = CTools.getInstance().arrayBufferToString(dataFields[1]);
              let content = dataFields[2];
              let dataType = dataFields[0];

              // Convert content based on type
              let value;
              switch (dataType) {
                case eDataType.bytes:
                  value = CTools.getInstance().arrayBufferToString(content);
                  break;
                case eDataType.unsignedInteger:
                  value = CTools.getInstance().arrayBufferToNumber(content);
                  break;
                case eDataType.signedInteger:
                  value = CTools.getInstance().arrayBufferToNumber(content);
                  break;
                default:
                  value = '[binary data]';
              }
              this.log('📄 File: ' + fileName + ' = ' + value);
            }
          }
        }
      }
    }
  }
}
Thread IDs: Isolating Your dApp’s Communication
Every dApp instance needs its own thread ID — a unique identifier that tags all outgoing requests so the system can route responses back to the correct window. You set this in the constructor with:
this.setThreadID = 'HELLO_BLOCKCHAIN_' + this.getProcessID;
The pattern is a descriptive prefix plus this.getProcessID (a unique number assigned to each running dApp instance). Once set, you pass this.getThreadID as the thread parameter to all DFS method calls. This is how the system’s built-in dApps work — for example, Terminal.js uses 'XTERM_THREAD_' + this.getProcessID and FileManager uses window.getThreadID throughout.
Without a unique thread ID, responses from the blockchain could be misrouted to other dApp instances, causing data corruption or missed callbacks.
Reading a Specific File
readFile(filePath) {
  const fs = CVMContext.getInstance().getFileSystem;
  let result = fs.doGetFile(filePath, false, this.getThreadID);
  this.addNetworkRequestID(result.getReqID);
  this.log('📖 Reading file: ' + filePath);
  // Response arrives in onDFSMessage callback
}
Step 4: Write Data — BT/CT Transactions and GridScript Basics
Reading data is free and instant. Writing data requires a transaction. This is the fundamental difference between a centralised application and a decentralised one: every state change must be cryptographically signed, validated by the network, and recorded immutably on the blockchain.
The GRIDNET OS transaction model uses two concepts that map directly to database transactions:
BT(Begin Transaction) — opens a transaction block. All subsequent state changes are staged.CT(Commit Transaction) — finalises the transaction and submits it to the blockchain for consensus.
Between BT and CT, you can perform file system operations — create files, write data, create directories — and they will all be atomically committed as a single blockchain transaction.
Writing Files to the Blockchain
The simplest way to write data is through the DFS API:
writeMessage(message) {
  const fs = CVMContext.getInstance().getFileSystem;

  // Create or update a file in the current directory
  let result = fs.doNewFile('hello.txt', message, false, this.getThreadID);
  this.addNetworkRequestID(result.getReqID);
  this.log('✍️ Writing message to hello.txt...');

  // The file is now staged in the local state.
  // To persist it to the blockchain, we need to COMMIT.
}
Committing Changes to the Blockchain
The commit operation is how staged changes become permanent on-chain state. When you commit, GRIDNET Core packages all your pending changes into a blockchain transaction, has it signed (via QR code on your mobile wallet or local keychain), and submits it to the network for consensus.
commitChanges() {
  const fs = CVMContext.getInstance().getFileSystem;

  // Request a commit — this triggers the signing workflow
  let result = fs.doCommit();
  this.addNetworkRequestID(result.getReqID);
  this.log('🔐 Commit requested. Awaiting authorization...');

  // The commit flow:
  // 1. doCommit() sends a commit request to GRIDNET Core
  // 2. Core prepares the transaction and requests signing
  // 3. User authorizes (via QR code / mobile wallet / local keychain)
  // 4. Signed transaction is broadcast to the network
  // 5. Network validates and includes in next data block
  // 6. Your onDFSMessage callback receives confirmation
}
You can monitor commit state through the VMCommitStateChanged listener:
// In constructor:
CVMContext.getInstance().addVMCommitStateChangedListener(
  this.onCommitStateChanged.bind(this), this.mID);

// Callback:
onCommitStateChanged(state) {
  switch (state) {
    case eCommitState.prePending:
      this.log('🔒 Commit pre-locked (preparing)...');
      break;
    case eCommitState.pending:
      this.log('⏳ Commit pending (awaiting consensus)...');
      break;
    case eCommitState.success:
      this.log('✅ Commit successful! Data is now on-chain!');
      break;
    case eCommitState.aborted:
      this.log('❌ Commit aborted.');
      break;
  }
}
GridScript: The Shell Beneath
For more advanced operations — transferring tokens, executing smart contracts, managing permissions — you use GridScript, the stack-based programming language native to GRIDNET OS. GridScript commands are executed through the Terminal dApp or programmatically through your dApp.
Here are the most common GridScript commands you’ll encounter:
# Navigation (same as Linux/DOS)
cd /                    # Change to root directory
ls                      # List directory contents
cd myDomain             # Enter a state domain

# File operations
cat hello.txt           # Read file contents
touch newfile.txt       # Create empty file
mkdir myFolder          # Create directory
rm oldfile.txt          # Delete file

# Token transfers
send recipientAddress 100   # Send 100 GNC tokens

# Transactions
BT                      # Begin Transaction
  send alice 50         # Stage a transfer
  touch receipt.txt     # Stage a file creation
CT                      # Commit Transaction (atomic)

# Permissions (ACL)
setfacl user:bob:rw myfile.txt    # Grant read/write
getfacl myfile.txt                # View permissions
chown bob myfile.txt              # Change ownership
The BT/CT model is powerful because everything between them is atomic — either all operations succeed, or none of them do. This is the same guarantee SQL databases provide with BEGIN/COMMIT, but backed by decentralised consensus instead of a central server.
Step 5: Deploy On-Chain — The .app Format and DFS Commit
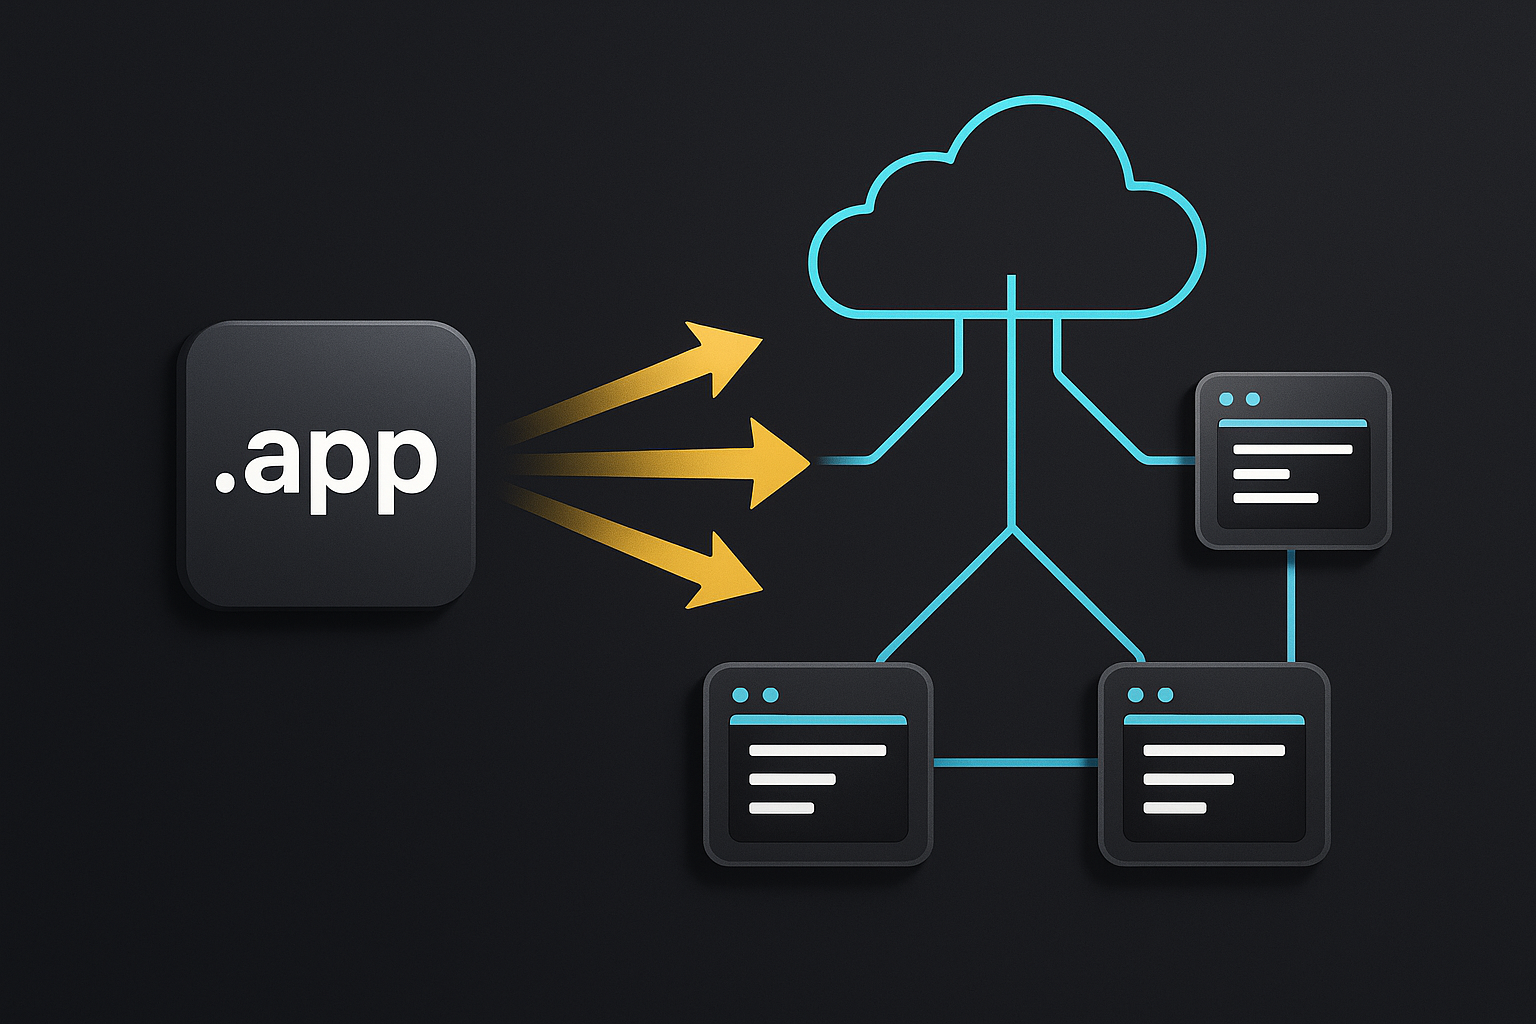
Deploying your dApp to GRIDNET OS is remarkably simple. There is no app store, no review process, no gatekeepers. You deploy directly to the decentralised file system, and your application becomes available to anyone running a GRIDNET Core node.
Step 5.1: Prepare Your .app File
A .app file is simply your JavaScript file with its extension changed. That’s it. No compilation, no transpilation (unless you choose to bundle multiple source files together).
# If your file is HelloBlockchain.js, simply rename it:
# HelloBlockchain.js → HelloBlockchain.app
For larger projects with multiple source files, use a bundler like Rollup, Webpack, or Parcel to combine everything into a single file before renaming. Remember: you can freely import system-provided libraries (anything under /lib/) — those are available at runtime. Only your own code and non-system dependencies need to be in the .app file.
Step 5.2: Upload to the GRIDNET OS Desktop
- Open the GRIDNET OS UI in your browser (
https://ui.gridnet.orgor your local instance) - Open the File Manager dApp
- Drag and drop your
.appfile onto the File Manager window or directly onto the Desktop - The PackageManager will analyse your file — watch the log pane at the bottom of the screen for events
- Once analysed, your dApp’s icon appears on the Desktop. Click it to run!
At this point, your dApp runs in a local sandbox — it’s loaded from your local upload but not yet persisted to the blockchain.
Step 5.3: Commit to the Decentralized Network
To make your dApp permanent and globally available:
- In the File Manager, locate your uploaded
.appfile - Click the ⋮⋮⋮ Magic Button (the three-dot commit button) to initiate a DFS commit
- Authorize the transaction (via QR code on your mobile wallet or local keychain)
- Once the commit is confirmed by the network, your dApp is permanently stored on-chain
After committing, anyone running a GRIDNET Core node can navigate to your state domain, find your .app file, and run your decentralized application. No servers. No hosting fees (beyond the one-time GNC storage cost). No single point of failure.
The Complete Working Example: “Hello Blockchain” — Read and Write to the Chain
Here is the complete, runnable dApp that ties everything together. This application lets you write a message to the blockchain and read it back — a full round-trip through the decentralised stack. Copy this entire file, save it as HelloBlockchain.app, and deploy it.
"use strict"

// ── Imports ──────────────────────────────────────────────────────
import { CWindow } from "/lib/window.js"
import { CVMMetaSection, CVMMetaEntry, CVMMetaGenerator, CVMMetaParser }
  from '/lib/MetaData.js'
import { CTools, CDataConcatenator } from '/lib/tools.js'

// ── HTML Body ────────────────────────────────────────────────────
const helloBody = `
<link rel="stylesheet" href="/css/windowDefault.css" />
<style>
  * { box-sizing: border-box; margin: 0; padding: 0; }

  .app-container {
    display: flex;
    flex-direction: column;
    height: 100%;
    width: 100%;
    padding: 1.5em;
    font-family: 'Rajdhani', sans-serif;
    color: #22fafc;
    background: linear-gradient(135deg, #0a0a14 0%, #0d1a2d 50%, #0a1628 100%);
    overflow-y: auto;
  }

  .app-header {
    display: flex;
    align-items: center;
    gap: 0.8em;
    margin-bottom: 1.2em;
  }

  .app-header h1 {
    font-size: 1.5rem;
    text-shadow: 0 0 12px rgba(34, 250, 252, 0.4);
  }

  /* ── Status Bar ── */
  .status-bar {
    display: flex;
    gap: 1.2em;
    margin-bottom: 1.2em;
    flex-wrap: wrap;
  }

  .status-item {
    display: flex;
    align-items: center;
    gap: 0.3em;
    font-size: 0.8rem;
    color: #8892b0;
  }

  .dot {
    width: 0.5em; height: 0.5em;
    border-radius: 50%;
    background: #ff4444;
    transition: all 0.3s;
  }
  .dot.ok { background: #00ff88; box-shadow: 0 0 6px #00ff88; }

  /* ── Sections ── */
  .section {
    background: rgba(10, 22, 40, 0.6);
    border: 1px solid #1a3a5c;
    border-radius: 8px;
    padding: 1em;
    margin-bottom: 1em;
  }
  .section h2 {
    font-size: 1rem;
    color: #ffd700;
    margin-bottom: 0.6em;
    text-transform: uppercase;
    letter-spacing: 1px;
  }

  /* ── Input Row ── */
  .input-row {
    display: flex;
    gap: 0.6em;
  }
  .input-row input {
    flex: 1;
    padding: 0.5em 0.8em;
    border: 1px solid #1a3a5c;
    border-radius: 4px;
    background: #0a0e1a;
    color: #22fafc;
    font-family: 'Rajdhani', sans-serif;
    font-size: 0.9rem;
    outline: none;
    transition: border-color 0.3s;
  }
  .input-row input:focus {
    border-color: #00f0ff;
    box-shadow: 0 0 8px rgba(0, 240, 255, 0.2);
  }

  /* ── Buttons ── */
  .btn {
    padding: 0.5em 1.2em;
    border: 1px solid #00f0ff;
    border-radius: 4px;
    background: rgba(0, 240, 255, 0.1);
    color: #00f0ff;
    font-family: 'Rajdhani', sans-serif;
    font-size: 0.85rem;
    font-weight: bold;
    text-transform: uppercase;
    letter-spacing: 1px;
    cursor: pointer;
    transition: all 0.3s;
    white-space: nowrap;
  }
  .btn:hover {
    background: rgba(0, 240, 255, 0.25);
    box-shadow: 0 0 12px rgba(0, 240, 255, 0.3);
  }
  .btn.gold {
    border-color: #ffd700;
    color: #ffd700;
    background: rgba(255, 215, 0, 0.1);
  }
  .btn.gold:hover {
    background: rgba(255, 215, 0, 0.25);
    box-shadow: 0 0 12px rgba(255, 215, 0, 0.3);
  }
  .btn.green {
    border-color: #00ff88;
    color: #00ff88;
    background: rgba(0, 255, 136, 0.1);
  }
  .btn.green:hover {
    background: rgba(0, 255, 136, 0.25);
    box-shadow: 0 0 12px rgba(0, 255, 136, 0.3);
  }

  /* ── Message Display ── */
  .message-display {
    padding: 0.8em;
    background: #0a0e1a;
    border: 1px dashed #1a3a5c;
    border-radius: 4px;
    font-family: monospace;
    font-size: 0.9rem;
    color: #00ff88;
    min-height: 2.5em;
    word-break: break-all;
  }

  /* ── Log ── */
  .log-area {
    flex: 1;
    min-height: 6em;
    background: #0a0e1a;
    border: 1px solid #1a3a5c;
    border-radius: 6px;
    padding: 0.6em;
    font-family: monospace;
    font-size: 0.75rem;
    color: #556688;
    overflow-y: auto;
    white-space: pre-wrap;
    word-break: break-all;
  }
</style>

<div class="app-container">
  <div class="app-header">
    <h1>🔗 Hello Blockchain</h1>
  </div>

  <div class="status-bar">
    <div class="status-item">
      <div class="dot" id="dotConn"></div> <span id="lblConn">Disconnected</span>
    </div>
    <div class="status-item">
      <div class="dot" id="dotVM"></div> <span id="lblVM">VM: —</span>
    </div>
    <div class="status-item">
      <div class="dot" id="dotCommit"></div> <span id="lblCommit">Commit: Idle</span>
    </div>
  </div>

  <!-- Write Section -->
  <div class="section">
    <h2>✍️ Write to Blockchain</h2>
    <div class="input-row">
      <input type="text" id="msgInput" placeholder="Type your message here..." />
      <button class="btn gold" id="btnWrite">Write</button>
      <button class="btn green" id="btnCommit">Commit</button>
    </div>
  </div>

  <!-- Read Section -->
  <div class="section">
    <h2>📖 Read from Blockchain</h2>
    <div style="display:flex; gap:0.6em; margin-bottom:0.6em;">
      <button class="btn" id="btnRead">Read Message</button>
      <button class="btn" id="btnList">List Files</button>
    </div>
    <div class="message-display" id="readResult">No data yet — click "Read Message" after writing.</div>
  </div>

  <!-- Log -->
  <div class="section" style="flex:1; display:flex; flex-direction:column;">
    <h2>📋 Event Log</h2>
    <div class="log-area" id="logArea">Hello Blockchain dApp initialized.</div>
  </div>
</div>
`;

// ── dApp Class ───────────────────────────────────────────────────
class CHelloBlockchain extends CWindow {

  constructor(positionX, positionY, width, height, data, dataType, filePath, thread) {
    super(positionX, positionY, width, height, helloBody,
      "Hello Blockchain", CHelloBlockchain.getIcon(), true);

    this.mTools = CTools.getInstance();
    this.mMetaParser = new CVMMetaParser();
    this.mPendingReadFile = false;

    // Set a unique thread ID for this dApp instance
    this.setThreadID = 'HELLO_BLOCKCHAIN_' + this.getProcessID;

    // Register all event listeners
    const ctx = CVMContext.getInstance();
    ctx.addConnectionStatusChangedListener(this.onConnectionChanged.bind(this), this.mID);
    ctx.addVMStateChangedListener(this.onVMStateChanged.bind(this), this.mID);
    ctx.addNewDFSMsgListener(this.onDFSMessage.bind(this), this.mID);
    ctx.addVMMetaDataListener(this.onVMMetaData.bind(this), this.mID);
    ctx.addNewGridScriptResultListener(this.onGridScriptResult.bind(this), this.mID);
    ctx.addVMCommitStateChangedListener(this.onCommitStateChanged.bind(this), this.mID);
  }

  // ── Package Info ───────────────────────────────────────────────
  static getPackageID() {
    return "org.gridnetproject.UIdApps.helloBlockchain";
  }
  static getDefaultCategory() { return 'dApps'; }
  static getIcon() {
    // A simple chain-link icon (replace with your own Base64 PNG)
    return '';
  }

  // ── Lifecycle ──────────────────────────────────────────────────
  open() {
    super.open();

    // Bind button click events
    this.getControl('btnWrite').addEventListener('click', () => this.writeMessage());
    this.getControl('btnCommit').addEventListener('click', () => this.commitChanges());
    this.getControl('btnRead').addEventListener('click', () => this.readMessage());
    this.getControl('btnList').addEventListener('click', () => this.listFiles());

    // Allow Enter key to trigger write
    this.getControl('msgInput').addEventListener('keydown', (e) => {
      if (e.key === 'Enter') this.writeMessage();
    });

    this.log('dApp started. Waiting for connection...');

    // Check if already connected
    if (CVMContext.getInstance().getConnectionState == eConnectionState.connected) {
      this.onConnectionChanged({ state: eConnectionState.connected });
    }
  }

  closeWindow() {
    // Listeners registered with this.mID are auto-cleaned
    super.closeWindow();
  }

  // ── Core Actions ───────────────────────────────────────────────

  writeMessage() {
    const input = this.getControl('msgInput');
    const message = input.value.trim();

    if (!message) {
      this.log('⚠️ Please enter a message first.');
      return;
    }

    if (CVMContext.getInstance().getConnectionState != eConnectionState.connected) {
      this.log('❌ Not connected to GRIDNET Core.');
      return;
    }

    const fs = CVMContext.getInstance().getFileSystem;

    // Write the message as a file called "hello_message.txt"
    let result = fs.doNewFile('hello_message.txt', message, false, this.getThreadID);
    this.addNetworkRequestID(result.getReqID);

    this.log('✍️ Writing "' + message + '" to hello_message.txt...');
    this.log('💡 Click "Commit" to persist this to the blockchain.');
  }

  commitChanges() {
    if (CVMContext.getInstance().getConnectionState != eConnectionState.connected) {
      this.log('❌ Not connected to GRIDNET Core.');
      return;
    }

    const fs = CVMContext.getInstance().getFileSystem;
    let result = fs.doCommit();
    this.addNetworkRequestID(result.getReqID);

    this.log('🔐 Commit requested — awaiting authorization...');
  }

  readMessage() {
    if (CVMContext.getInstance().getConnectionState != eConnectionState.connected) {
      this.log('❌ Not connected to GRIDNET Core.');
      return;
    }

    const fs = CVMContext.getInstance().getFileSystem;
    this.mPendingReadFile = true;

    // First sync to get latest state, then read the file
    fs.doSync();

    let result = fs.doGetFile('hello_message.txt', false, this.getThreadID);
    this.addNetworkRequestID(result.getReqID);

    this.log('📖 Reading hello_message.txt from blockchain...');
  }

  listFiles() {
    if (CVMContext.getInstance().getConnectionState != eConnectionState.connected) {
      this.log('❌ Not connected to GRIDNET Core.');
      return;
    }

    const fs = CVMContext.getInstance().getFileSystem;

    // Navigate to root and list
    let result = fs.doCD('/', true, false, false, this.getThreadID);
    this.addNetworkRequestID(result.getReqID);

    // Also request a standalone LS
    let lsResult = fs.doLS(this.getThreadID);
    this.addNetworkRequestID(lsResult.getReqID);

    this.log('📂 Listing files...');
  }

  // ── Event Callbacks ────────────────────────────────────────────

  onConnectionChanged(event) {
    const dot = this.getControl('dotConn');
    const lbl = this.getControl('lblConn');

    if (event.state == eConnectionState.connected) {
      dot.classList.add('ok');
      lbl.textContent = 'Connected';
      this.log('✅ Connected to GRIDNET Core!');
    } else if (event.state == eConnectionState.connecting) {
      lbl.textContent = 'Connecting...';
    } else {
      dot.classList.remove('ok');
      lbl.textContent = 'Disconnected';
      this.log('❌ Disconnected.');
    }
  }

  onVMStateChanged(event) {
    const dot = this.getControl('dotVM');
    const lbl = this.getControl('lblVM');

    if (event.state == eVMState.ready || event.state == eVMState.synced) {
      dot.classList.add('ok');
      lbl.textContent = 'VM: Ready';
      this.log('✅ Decentralized VM ready.');
    } else if (event.state == eVMState.initializing) {
      lbl.textContent = 'VM: Init...';
    }
  }

  onCommitStateChanged(state) {
    const dot = this.getControl('dotCommit');
    const lbl = this.getControl('lblCommit');

    switch (state) {
      case eCommitState.prePending:
        lbl.textContent = 'Commit: Preparing';
        this.log('🔒 Commit preparing...');
        break;
      case eCommitState.pending:
        dot.classList.add('ok');
        lbl.textContent = 'Commit: Pending';
        this.log('⏳ Commit pending — awaiting consensus...');
        break;
      case eCommitState.success:
        dot.classList.add('ok');
        lbl.textContent = 'Commit: ✅ Success!';
        this.log('🎉 COMMIT SUCCESSFUL! Your data is now permanently on the blockchain!');
        // Reset after 3 seconds
        setTimeout(() => {
          dot.classList.remove('ok');
          lbl.textContent = 'Commit: Idle';
        }, 3000);
        break;
      case eCommitState.aborted:
        dot.classList.remove('ok');
        lbl.textContent = 'Commit: Aborted';
        this.log('❌ Commit aborted.');
        break;
      default:
        dot.classList.remove('ok');
        lbl.textContent = 'Commit: Idle';
    }
  }

  onDFSMessage(dfsMsg) {
    if (!this.hasNetworkRequestID(dfsMsg.getReqID)) return;

    if (dfsMsg.getData1.byteLength > 0) {
      let metaData = this.mMetaParser.parse(dfsMsg.getData1);

      if (metaData != 0) {
        let sections = this.mMetaParser.getSections;

        for (let i = 0; i < sections.length; i++) {
          let sType = sections[i].getType;

          if (sType == eVMMetaSectionType.fileContents) {
            let entries = sections[i].getEntries;

            for (let a = 0; a < entries.length; a++) {
              let fields = entries[a].getFields;
              let entryType = entries[a].getType;

              if (entryType == eDFSElementType.fileContent) {
                let fileName = this.mTools.arrayBufferToString(fields[1]);
                let dataType = fields[0];
                let rawData = fields[2];

                let value;
                if (dataType == eDataType.bytes) {
                  value = this.mTools.arrayBufferToString(rawData);
                } else if (dataType == eDataType.unsignedInteger ||
                           dataType == eDataType.signedInteger) {
                  value = this.mTools.arrayBufferToNumber(rawData);
                } else {
                  value = '[binary: ' + rawData.byteLength + ' bytes]';
                }

                if (fileName === 'hello_message.txt' || this.mPendingReadFile) {
                  this.getControl('readResult').textContent = value;
                  this.mPendingReadFile = false;
                  this.log('📄 Read ' + fileName + ': "' + value + '"');
                } else {
                  this.log('📄 ' + fileName + ' = ' + value);
                }
              }
              else if (entryType == eDFSElementType.directoryEntry) {
                let dirName = this.mTools.arrayBufferToString(fields[1]);
                this.log('📁 [DIR]  ' + dirName);
              }
              else if (entryType == eDFSElementType.fileEntry) {
                let fileName = this.mTools.arrayBufferToString(fields[1]);
                this.log('📄 [FILE] ' + fileName);
              }
              else if (entryType == eDFSElementType.stateDomainEntry) {
                let domainName = this.mTools.arrayBufferToString(fields[1]);
                this.log('🌐 [DOMAIN] ' + domainName);
              }
            }
          }
        }
      }
    }
  }

  onVMMetaData(metaMsg) {
    if (!this.hasNetworkRequestID(metaMsg.getReqID)) return;
    this.log('📡 Meta-data response received.');
  }

  onGridScriptResult(result) {
    if (result == null) return;
    this.log('⚡ GridScript execution completed.');
  }

  // ── Utility ────────────────────────────────────────────────────
  log(message) {
    const area = this.getControl('logArea');
    if (!area) return;
    const ts = new Date().toLocaleTimeString();
    area.textContent += '\n[' + ts + '] ' + message;
    area.scrollTop = area.scrollHeight;
  }
}

// Static settings field
CHelloBlockchain.sCurrentSettings = null;

export default CHelloBlockchain;
How to Use This dApp
- Save the code above as
HelloBlockchain.app - Open GRIDNET OS in your browser (
https://ui.gridnet.orgor your local instance) - Drag and drop the
.appfile onto the Desktop or File Manager - The dApp window opens. Watch the status indicators turn green as it connects.
- Type a message and click Write — this stages the file locally
- Click Commit — authorise the transaction when prompted
- After the commit succeeds, click Read Message — your message is read back from the blockchain!
- Click List Files to see all files in your current directory
Congratulations. You have just built a decentralized application that reads and writes to a blockchain — using nothing but HTML, CSS, and JavaScript.
What Just Happened — The Full Picture
Let’s step back and see the complete journey your data takes:
- Write:
doNewFile()sends your data to GRIDNET Core via WebSocket. The data is staged locally in the node’s pending state. - Stage: Your changes exist in a local buffer. They’re real to your session but not yet committed to the blockchain.
- Commit:
doCommit()requests the node to package all staged changes into a blockchain transaction. - Sign: The transaction is cryptographically signed — either by scanning a QR code with the GRIDNET mobile wallet, or via a locally stored keychain.
- Consensus: The signed transaction is broadcast to the peer-to-peer network. Other nodes validate it. Once consensus is reached, it’s included in the next data block.
- On-chain: Your data is now permanently and immutably stored on the GRIDNET OS blockchain. Any node anywhere in the world can read it.
The entire round-trip — from typing a message in your browser to having it permanently stored on a decentralized blockchain — takes seconds. And you wrote it in HTML, CSS, and JavaScript.
What to Build Next
You’ve built your first dApp. Here’s where to go from here:
- Explore the existing dApps: Study the source code of Terminal.js, FileManager.js, and the Wallet dApp for production-grade patterns
- Read the UI dApp Design Guidelines — the complete reference for all rules, patterns, and best practices
- Learn GridScript — the GridScript Comprehensive Guide covers the stack-based language in depth, including smart contracts and advanced operations
- Use the Blockchain Explorer API — query blocks, transactions, and domain data programmatically through CVMContext
- Implement State-Less Channels — for instant, off-chain micropayments between users
- Build with WebRTC Swarms — for peer-to-peer real-time communication directly between browsers
- Deploy Identity Tokens — create on-chain identities and token pools for your application’s economy
The entire GRIDNET OS platform is open. There are no gatekeepers. No review boards. No permission required. You write code, you deploy it to the blockchain, and it runs — decentralized, censorship-resistant, and permanent. Welcome to the future of application development.
Welcome to GRIDNET OS. 🌐