
 What About? This document was designed to showcase basic functionalities and User-Interface of the GRIDNET OS mobile token app and get you going ASAP, without the need to receive system intrinsic assets from anyone.
For more information about The Project check out the Whitepaper.
What’s Next? Once familiarizing yourself with the basics, check-out a Tutorial linked to at the bottom of this page.
Note: Within this document there’s a QR code which instructs the mobile token app to import a specific already registered pre-paid State-Domain (account).
The account had been initially generated for Apple solely for the purpose of allowing for initial-validation of the app during the App Store submission process and it MAY NOT be valid and/or contain any assets anymore.
In such a likely case please proceed with generating a new wallet of your own and acquiring some assets as discussed later in this document. There are many promotional opportunities. For these make sure to follow our Twitter profile.
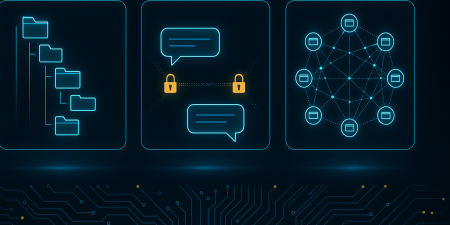
Main Functionalities
These are scattered around:
· confirming user actions performed within the GRIDNET OS decentralized operating system.
· securely storing user’s private key, which is used to perform strong cryptographic signatures in his name and to deliver these to the decentralized network on demand.
· reporting status of the user’s account balance.
· issuing transactions directly from the GRIDNET Token mobile app (coming soon).
· performing local computations at the request of remote nodes at the user’s consent. The results of such computations may be later delivered through the network. Note that at any point, the mobile app is not involved in ‘mining’ of ‘cryptocurrencies’.
For response deliveries there are a variety of encryption and routing(including onion routing) communication algorithms implemented.
Let us now proceed with showcasing the app itself.
-
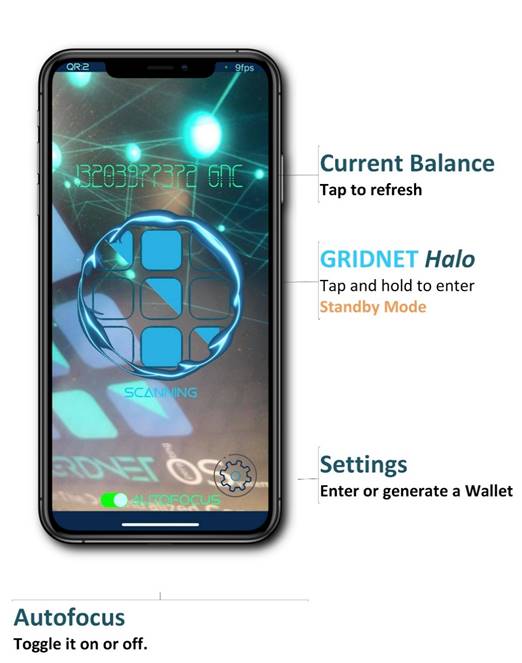
Main UI View
The primary screen of the mobile app is presented below:
-
Standby Mode
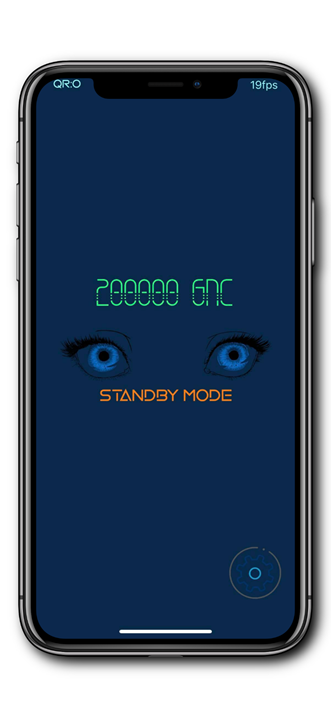
Enter standby mode by long-tapping the GRIDNET Halo.
In standby mode the Camera is deactivated saving on both the batterie’s and CPU’s usage. You may exit the standby mode by tapping at the center of the screen.
-
QR Intent’s Processing View:
-
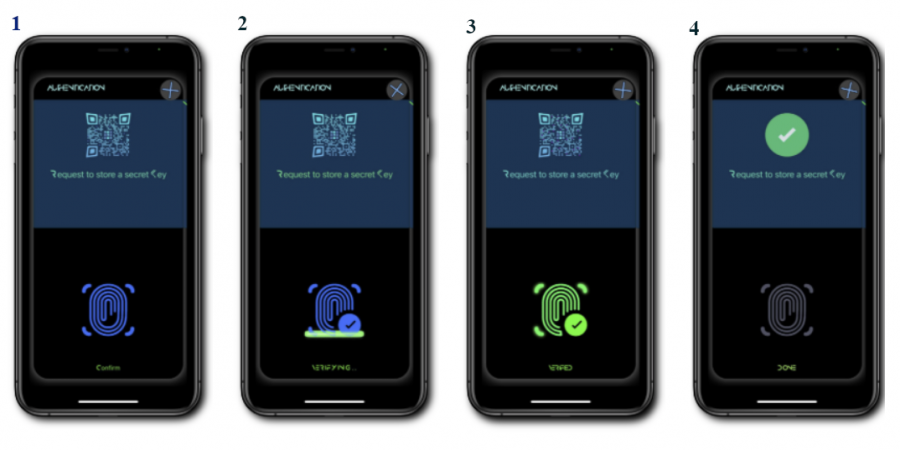
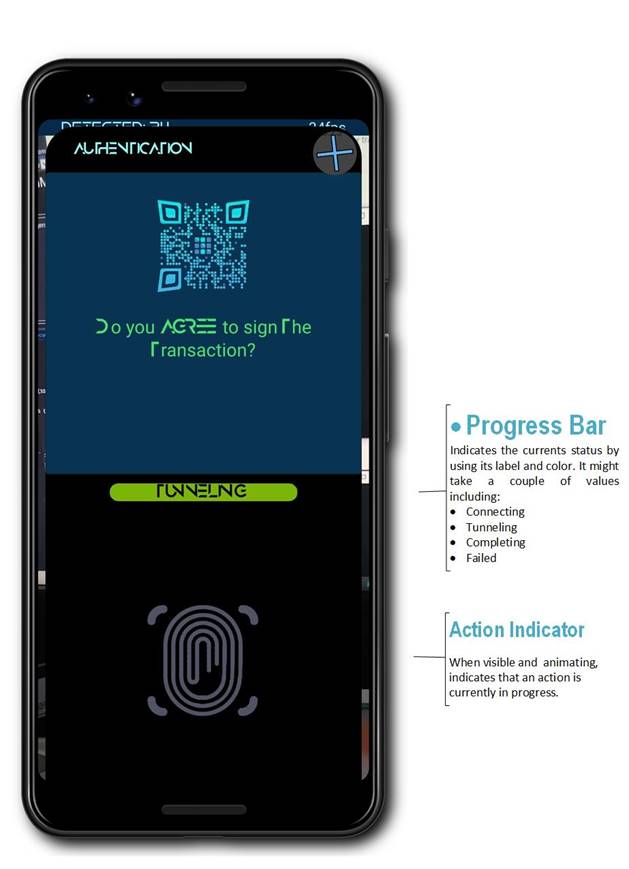
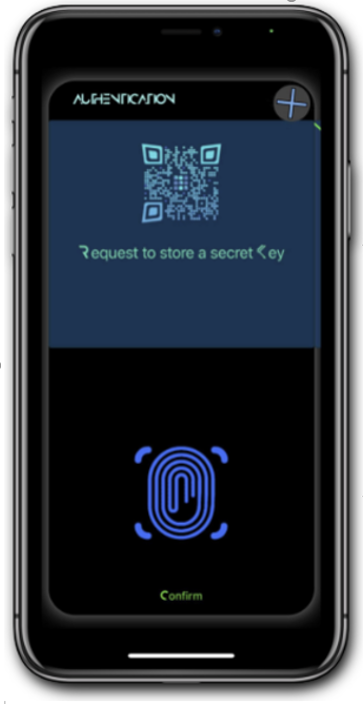
The QR Intent’s Confirmation Screen
At any case, the task which is to be performed is described to the user upon scanning of the QR Code / QT Intent. Note that user’s confirmation is required at all times. A sample screen shown to user after scanning of a QR Intent is presented on infographics below:
Some of the QR Intents will be valid only during an already established communication session as they are to deliver information required by an instance of a GRIDNET VM spawned to the user. The one user is accessing either through SSH or Web-UI.
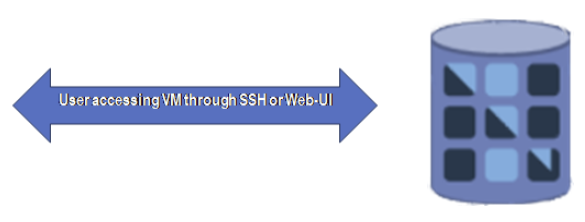
In such a case, user will use his mobile token app to provide authorization when needed. The QR Intent will be generated either directly through the full-node visible to the right (SSH session) , or the full node will instruct the Web-UI (running with a web browser) on how to generate the QR and what information it shall contain.
Above all, the QR code encapsulates IP address of the first hop in the communication chain (when Onion Routing invovled) also a public key to which the initial response is to be encrypted to.
What a QT Intent Encapsulates?
QR Intents may contain any kind of information needed for the mobile app to:
- encrypt outgoing data
- establish a multi-hop onion-routed communication between the mobile app and the remote destination (if needed and supported by the remote node).
- sometimes the app needs to deliver data ex. a signature to a node which serves a remote terminal of the system to which user is connected through either SSH or WebClient (running within a web-browser).
- some QR codes might request offline processing by the mobile app (not necessarily involving network connectivity ex. when importing a private key through a QR Intent).
- They may also contain arbitrary information which is to be presented to the user.
- The mobile app, together with the network of full-nodes supports some state-of-the-art connectivity ex. with tunneled end-to-end encrypted communication over full nodes spanning across UDT / WebRTC and WebSocket protocols (when communicating with Web-UI).
How the app communicates with the rest of the Network?
As for the response deliveries, there are quite a few possibilities and the communication protocol is open to a variety of encryption schemes and routing options. The app itself communicates always through UDT protocol. The datagram MAY be then routed through WebRTC and WebSocket protocols as decided by full-nodes and web-browsers.
Testing
Now we would like you to be able to test some of the interactions. Please do note that the web-interface has not been released yet, thus for now users can interact with the system over SSH.
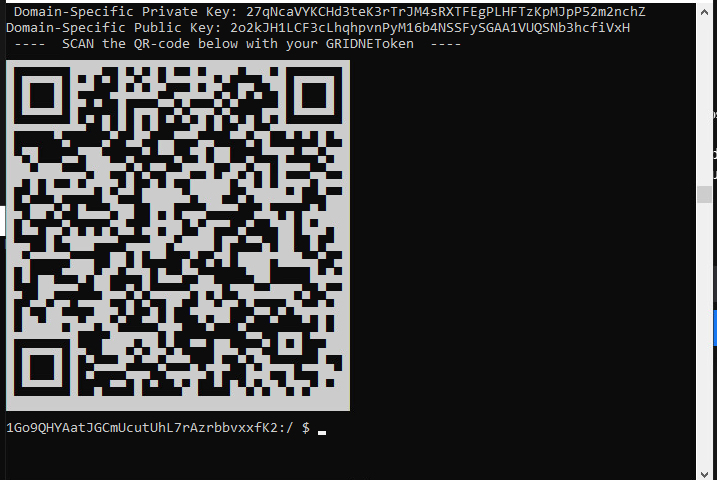
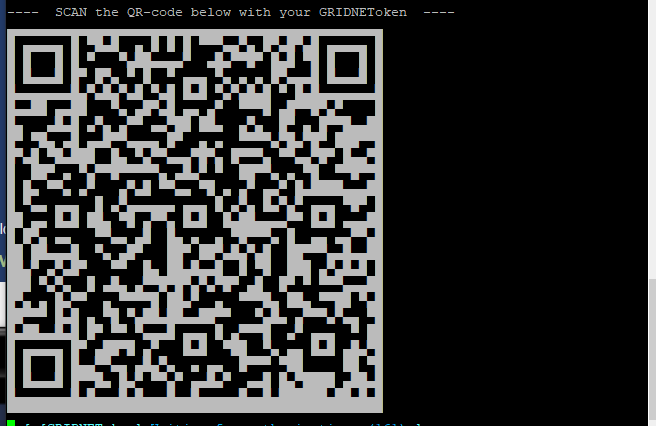
Below we provide you with an offline QR code instructing the app to ‘import’ a wallet, so there’s no need for you to copy the private key into the app.
Alternatively, you may choose to provide the app with the following secret in the settings pane:
‘JigupJjCNa6szvChWrJrnuFu4KgYncStT5ou8qLL9MkWXn25bYiaKMv8yU5rFapdZR9VxB1tGGsSRpHuLLq6wcA4ouzmdjFi’
In short, the ‘secret’ encapsulates a Base58 encoded private key, along with a checksum.
The wallet which will be imported into the app is already registered within the system and contains 2000000 GBUs (our internal utility). You may use that amount to test through the variety of functionalities as presented in the tutorial linked at the bottom by using SSH and the mobile app.
A Hint: you may try to feel like you would be using decentralized Linux (yeah we know it’s crazy).
The app is able to confirm interactions by providing a signature which is then broadcasted within the network.
You may scan that very QR code from the screenshot above with your mobile app and the private key will be imported directly into the iOS mobile app. The above QR code is being rendered with UNICODE 1.1 characters directly within a SSH terminal.
In a moment you will see the very same address as on the screenshot above within the Settings pane of the mobile app together with the current account’s balance (main view).
Right after you scan the code a screen like the one below would be shown to you on the mobile app:
-
QR Intent’s Details
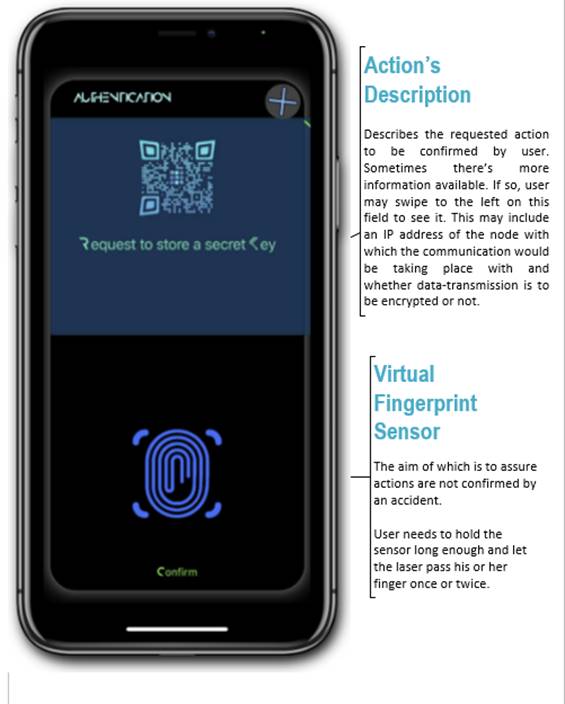
The app does its best to present details of the performed action to the user. The first view presents the most high-level description like the above about importing a private key.
For other QR Intents, especially those involving network connectivity and decentralized consensus the app will try its best to provide more description. We’ve implemented a dynamic meta-data generator which takes any QR Intent and attempts to generate its HTML/CSS description. If such meta-data has been generated it will be visible by swiping to the left on the upper bluish field. Sample screen below:
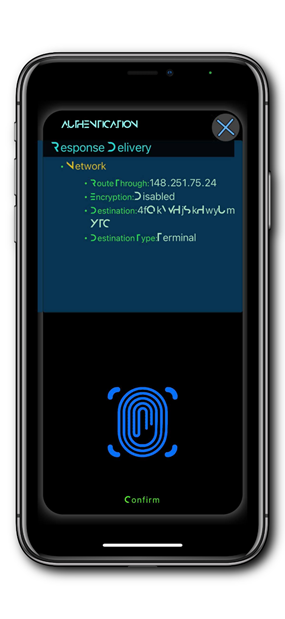
Here we provide a sample QR Intent taken from a sample SSH session which instructs the mobile app to sign and process a transaction:
Note: the QR Intent above targets a GRIDNET VM session which has already ended, which was served by a full-node which MIGHT be currently offline and the processing of it is thus doomed to ultimately fail.
Now all it takes to store the private key securely on the mobile device is to hold the bottom Virtual Fingerprint scanner.
Consecutive UI steps user is taken through are visible below:
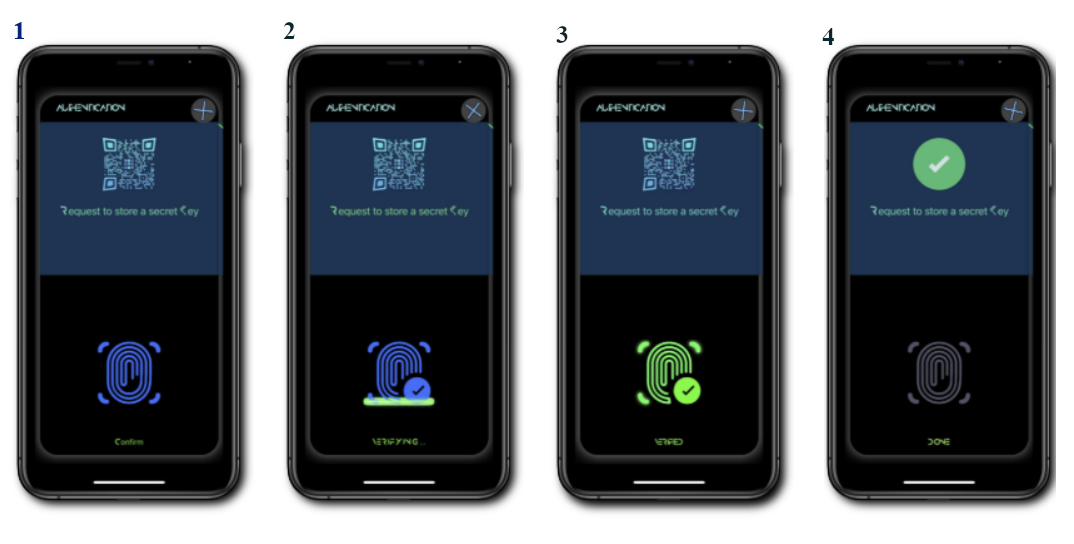
Now you may choose to close the pop-up window.
After a moment (every minute) the account’s balance would auto-refresh. You may also tap the text field above the GRIDNET Halo to force a refresh (the app allows for 1 refresh every 5 seconds)
At any point in time you may enter the Settings pane by clicking the bottom-right settings button. You would be presented with a view reassembling the one below:
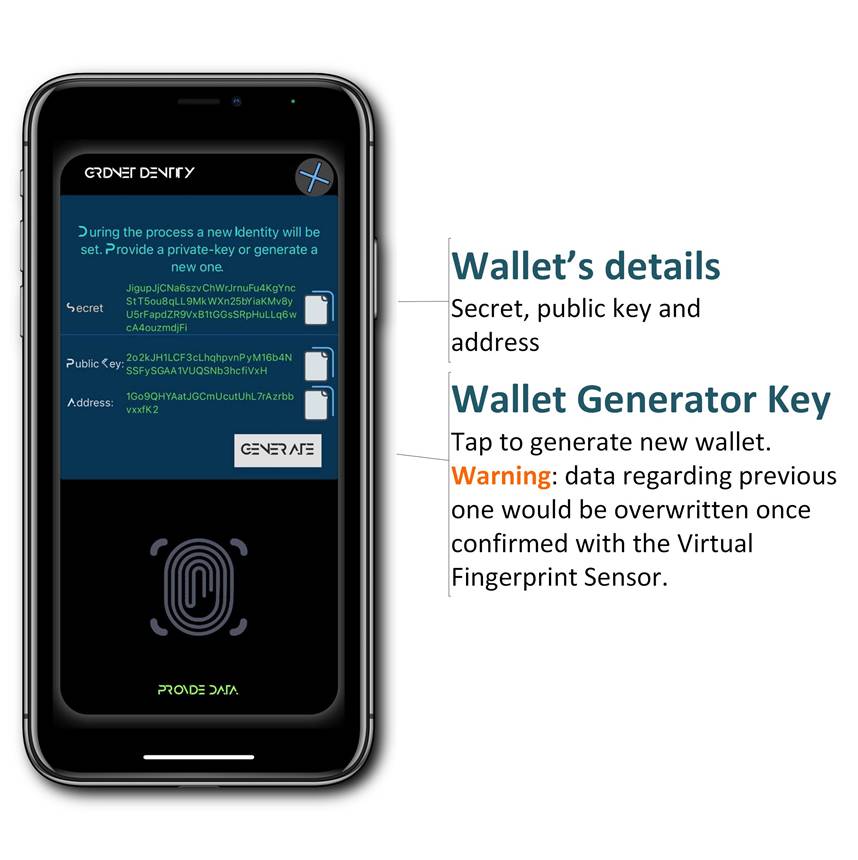
Important: remember to keep your Secret private at all times. That’s the only thing protecting your system-intrinsic assets. You may use Copy Buttons located to the right to move any of the wallet’s properties somewhere else. This might come in use when making a back-up copy of your wallet.
At this point you may continue with a Tutorial available here during which you’ll generate more QR Intents to test things out. Note that you may proceed directly to Stage 2 of it as you’ve already got your Wallet configured after performing the above.
Should you run out of our internal utility at any point please do let us know and we shall top-up the account right way.
You may also try to create directories, files, etc. Using typical Linux-like command’s syntax (ex. ‘mkdir’, ‘cat’, ‘less’, ,’head’ etc.). What you are doing is using our #GridScript programming language which is backwards compatible with Forth. Have fun!
Remaining at your disposal,
Wizards